Marketplace and Modules
Discover, install, and enable the modules your operation needs.
Last updated on June 25, 2026
Qualis is built from modules. Each module adds a focused set of features, for example Purchase Orders, Warehouses, or Inspections. The Marketplace is where you see everything available, turn on the modules your organization needs, and turn off the ones it does not. This guide shows you how to browse the catalog, read what a module does, install it, adjust its settings, and pause or remove it later.
How modules work
Think of the Marketplace as an app store for your organization. Every module is one app. You install the ones you want, and they appear in the sidebar and across the app for everyone in your organization. You only see and pay for what you install, so you can keep the app focused on how your team actually works.
A few things are worth knowing up front:
- Some modules are Free and some are Paid. The catalog labels each one.
- A few modules are marked Included. These are core parts of the app that are always on, so they cannot be installed or removed.
- Modules can depend on each other. When a module needs another one to work, installing it installs the other automatically. The Marketplace tells you before anything happens.
- Installing or removing a module never deletes your data. If you remove a module and add it back later, its data and settings come back with it.
Before you start
- Make sure the correct organization is active. The top bar shows which organization you are in, and modules you install apply only to that organization.
- Anyone can browse the Marketplace and read about a module. Installing, configuring, pausing, or removing a module is reserved for organization admins. If you are not an admin, those buttons will not appear.
Find the module you need
The Marketplace list shows every module, grouped by area, so you can scan what is available.
- Open the sidebar, scroll to the Administration group, and click Marketplace.
- The list opens, grouped into sections like Core, Product Management, and Purchasing. Each module shows a short description, its price label, and whether it is already installed.
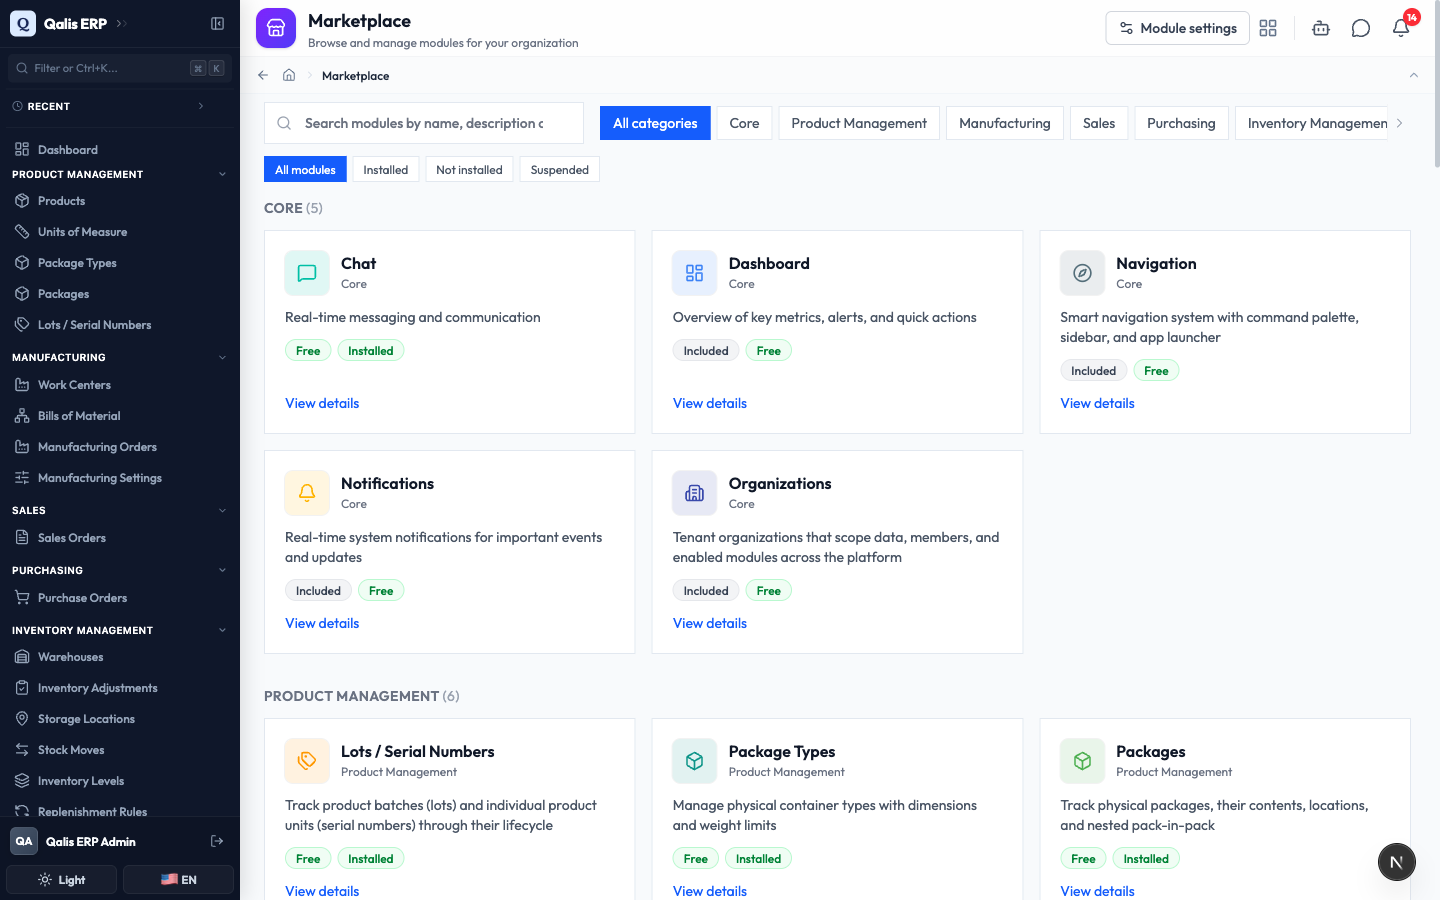
- To narrow the list, use the controls at the top:
- Type in the search box to match a module by name, description, or tag. The list filters as you type.
- Click a category pill (such as Purchasing) to show only that area.
- Click a state pill (All modules, Installed, Not installed, or Suspended) to filter by status.
When any filter is active, a blue banner appears showing each filter as a removable chip, with a Clear filters link to reset everything at once.
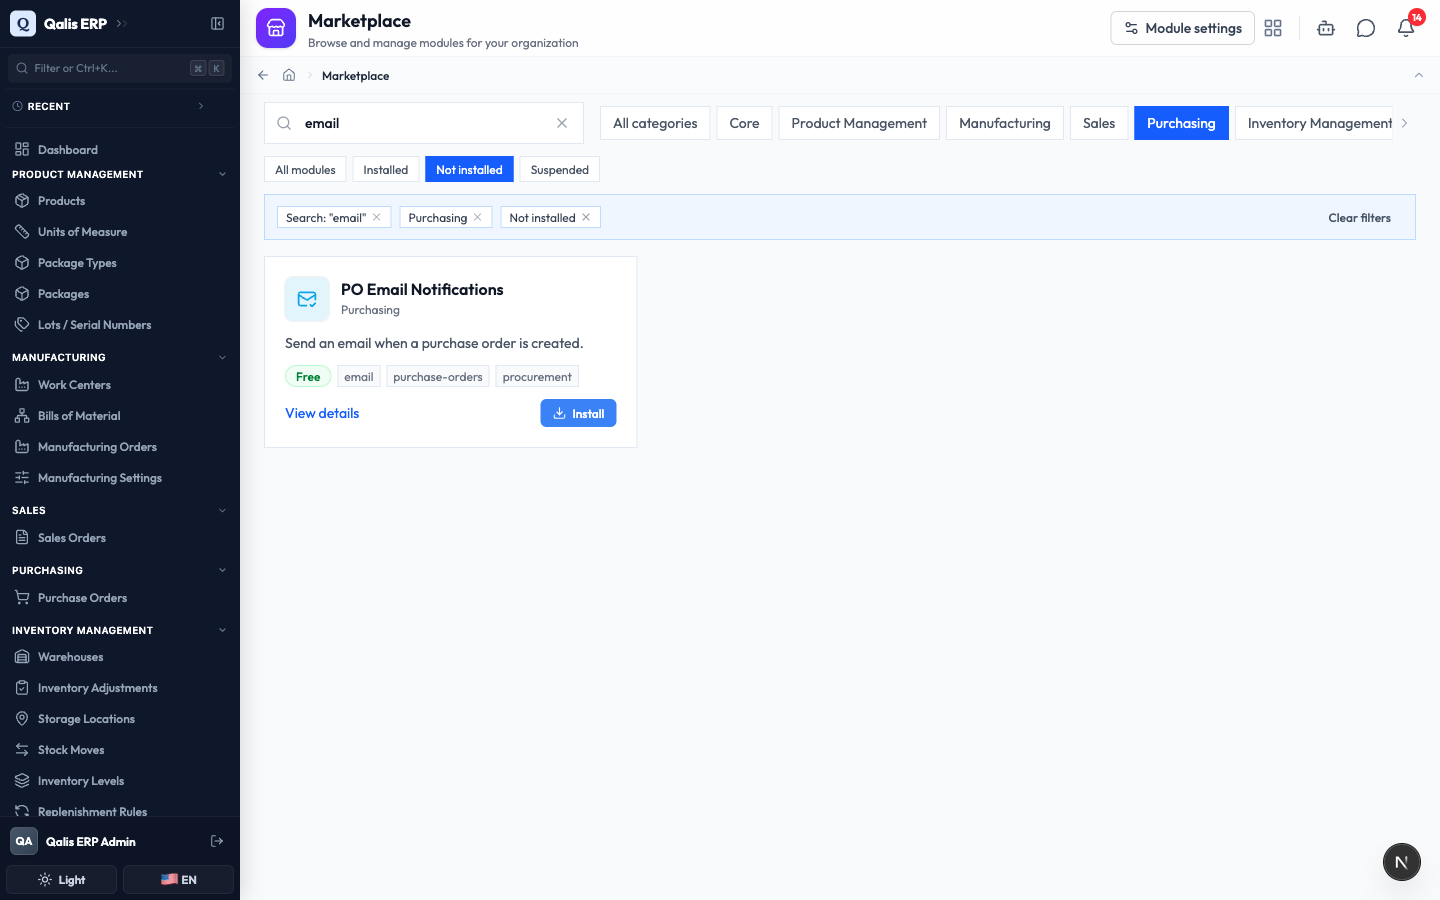
The web address updates as you filter. You can bookmark a filtered view or paste the link to a colleague, and they will see the same results.
See what a module does
Before you install a module, open its page to understand exactly what it adds.
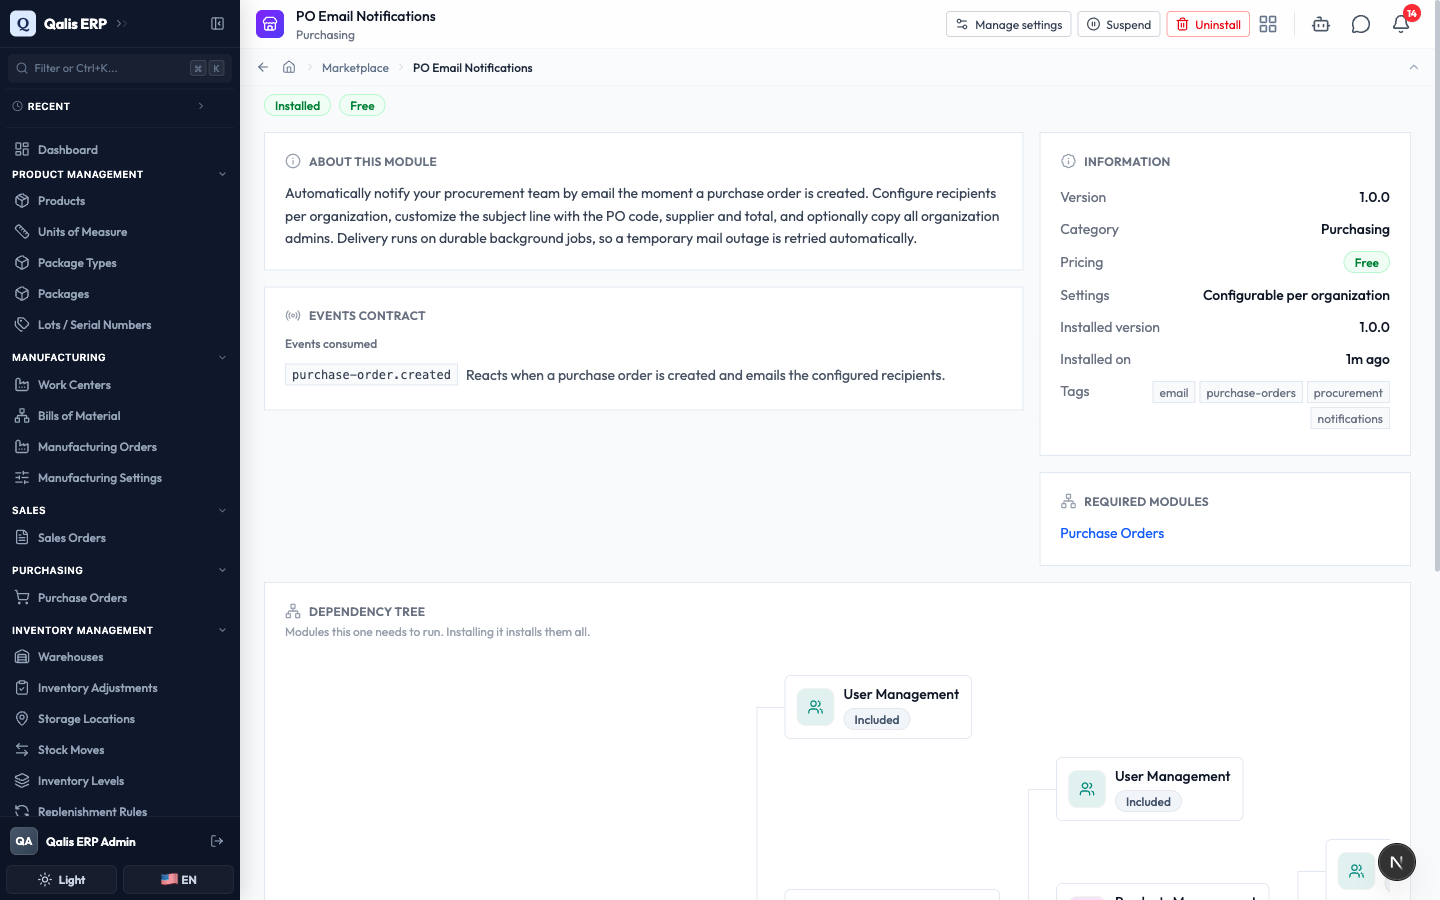
- From the list, click a module's name or its View details link. Here we open PO Email Notifications.
- The detail page explains the module in plain terms and lists everything about it.
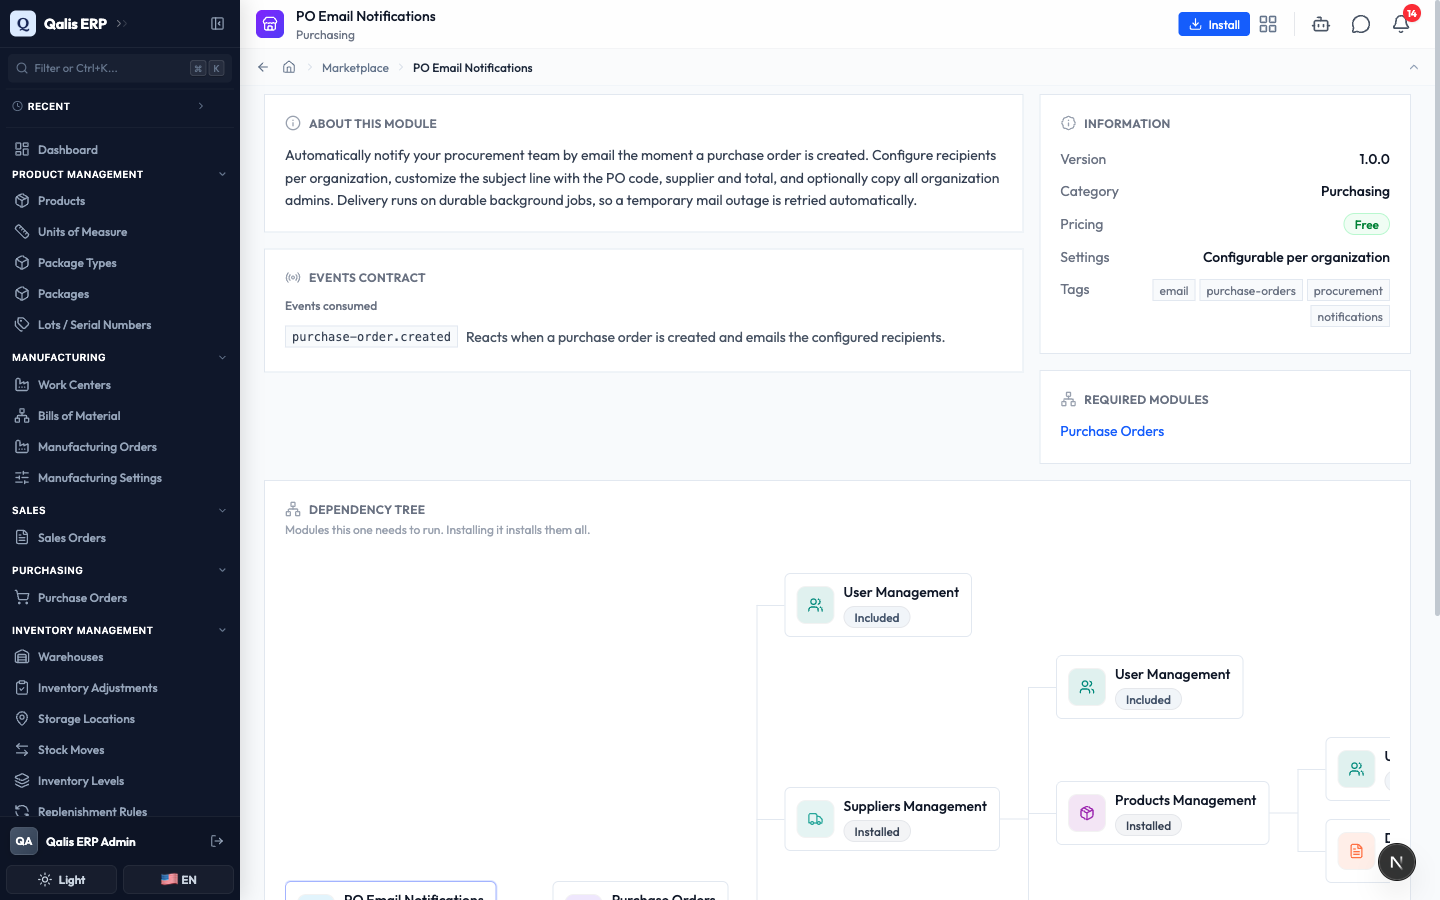
On this page you can read:
- About this module, a description of what it does and why you would use it.
- Information, a summary card with the Version, Category, Pricing, and whether the module has Settings you can configure.
- Required modules and the Dependency tree, which show any other modules this one needs. Installing this module installs those too.
- The Install button in the top right, ready for when you decide to add it.
Install a module
Installing turns the module on for your whole organization. Every install walks you through a short review first, so nothing is added by surprise.
- On the module's detail page, click Install in the top right. A guided window opens with three steps: Review, the module's own settings step, and Finish.
- On the Review step, read what installing the module changes. It lists any modules that will be installed alongside it, the permissions it adds, and the events it reacts to. Nothing is saved yet.
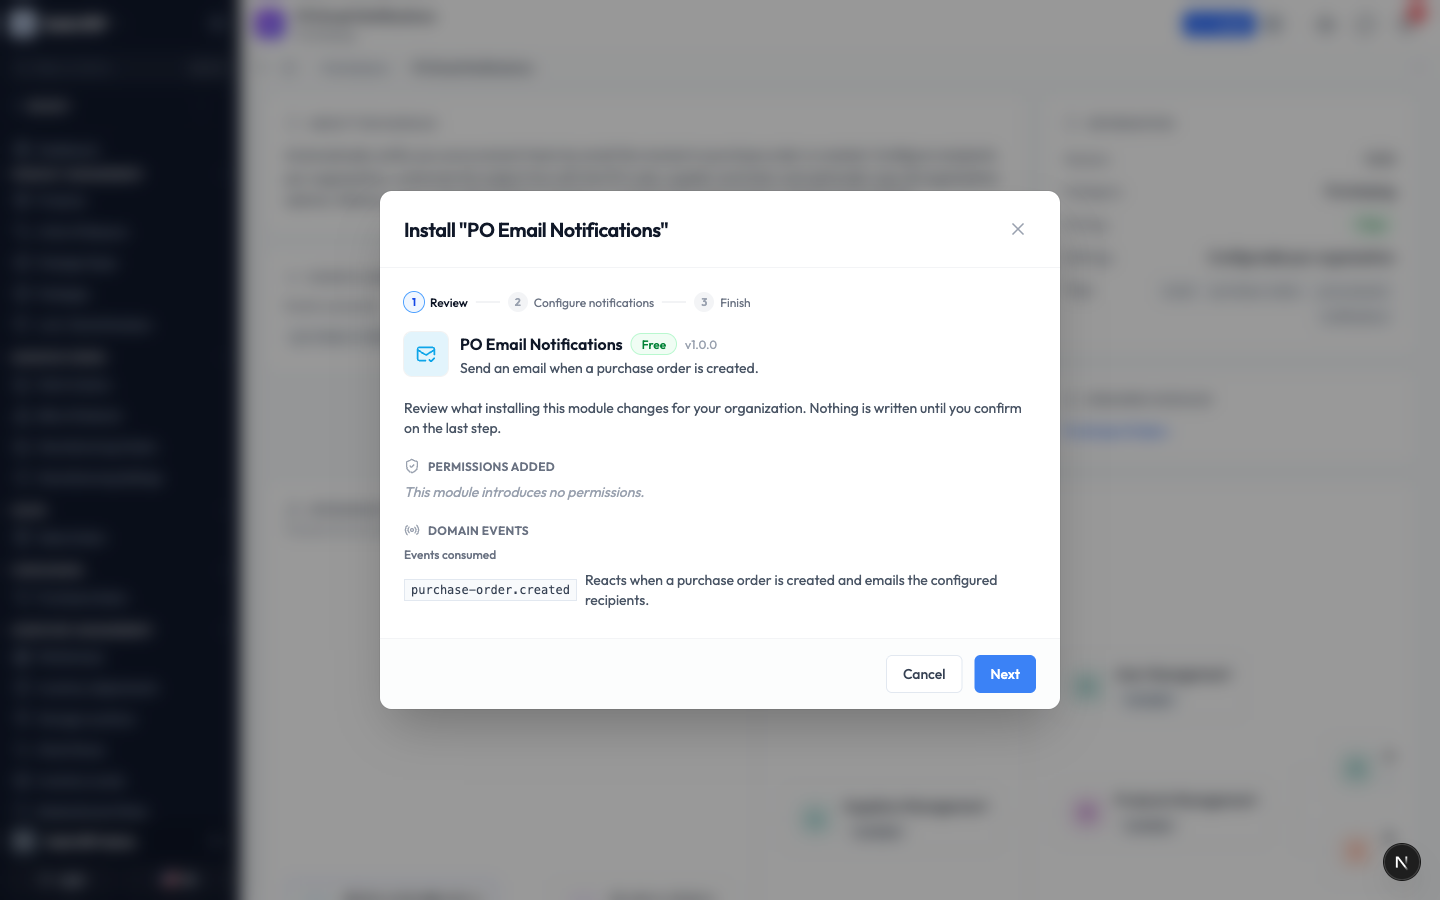
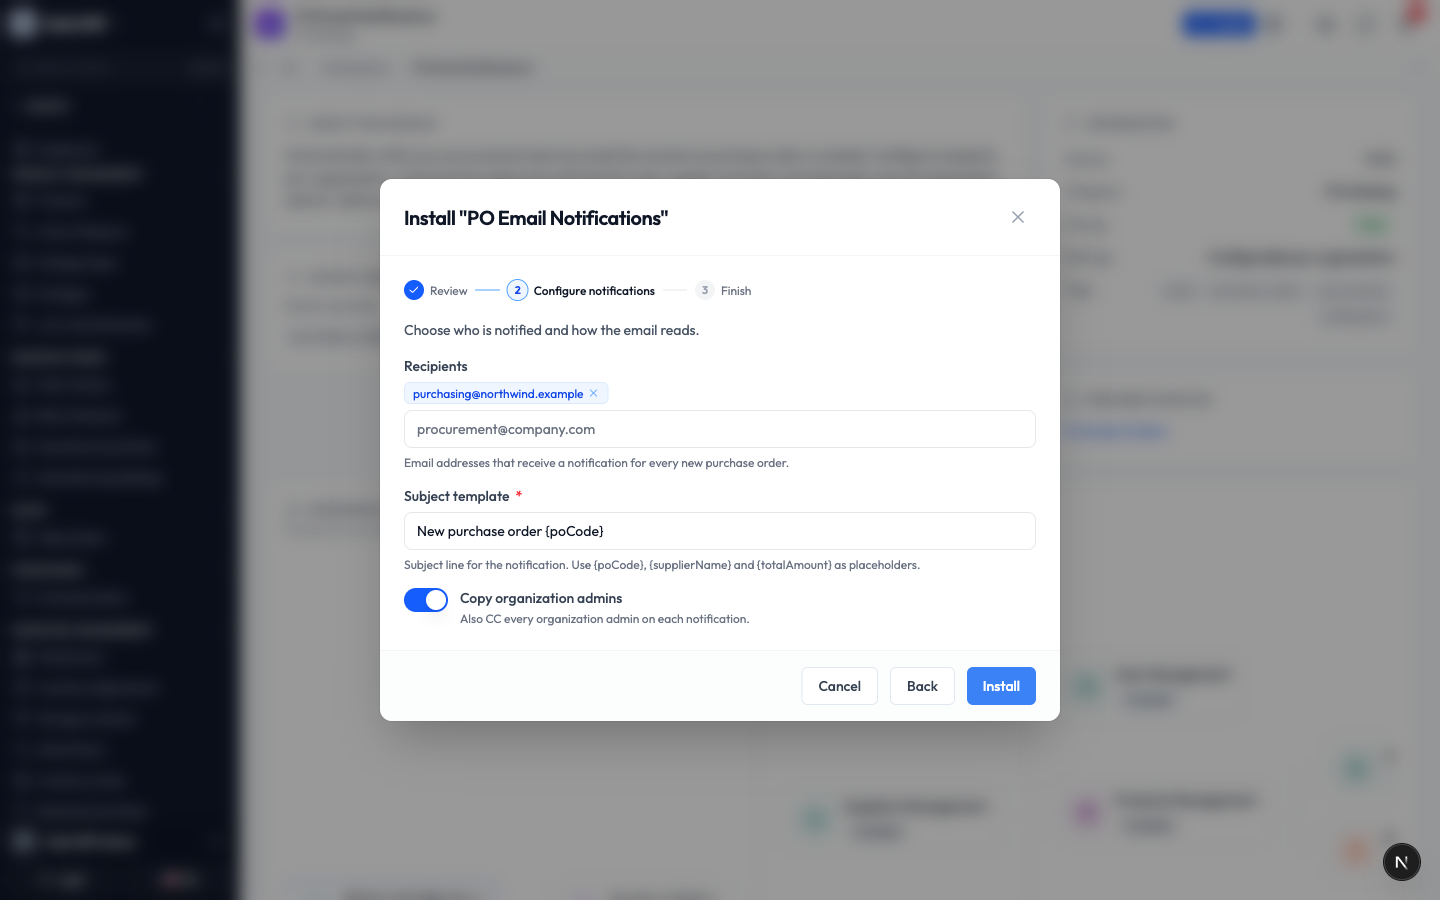
- Click Next. If the module has settings, you fill them in now. For PO Email Notifications you choose who gets notified and how the email reads:
- Recipients: type an email address and press Enter to add it. Each address appears as a removable chip above the box.
- Subject template: the subject line for the emails. You can include placeholders like
{poCode}. - Copy organization admins: turn this on to also send a copy to every admin.
- Click Install. A progress screen appears while the module is set up.
- When it finishes, you see a confirmation that the module is installed and already active in the navigation.
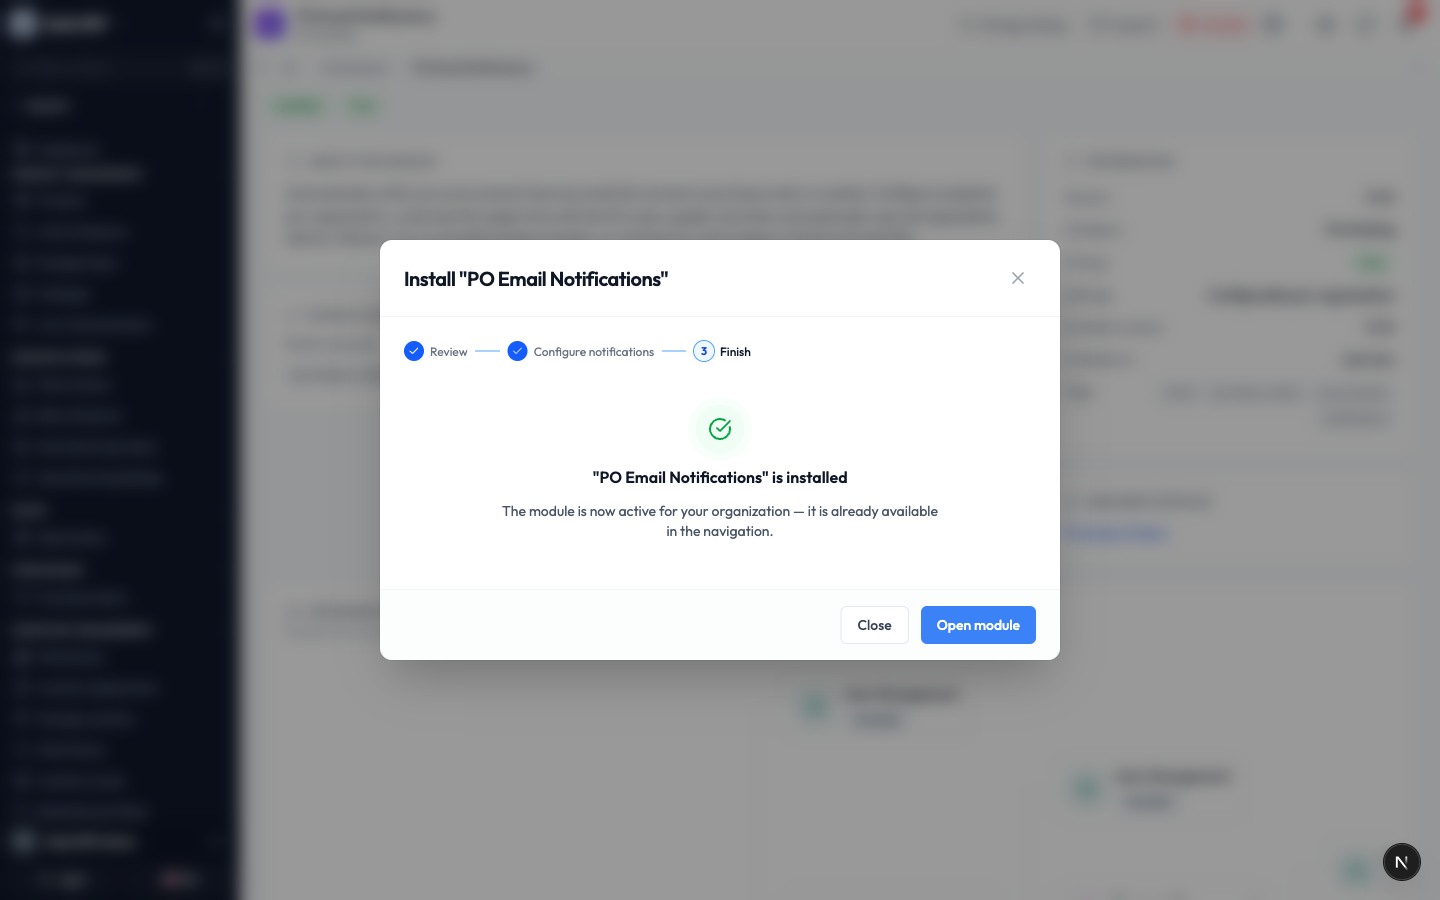
- Click Open module to jump straight to it, or Close to stay on the page.
The module is available to everyone in your organization right away. You do not need to refresh or sign out and back in.
Change a module's settings
Some modules have settings you can adjust at any time, not just during install. You can return to them whenever you need.
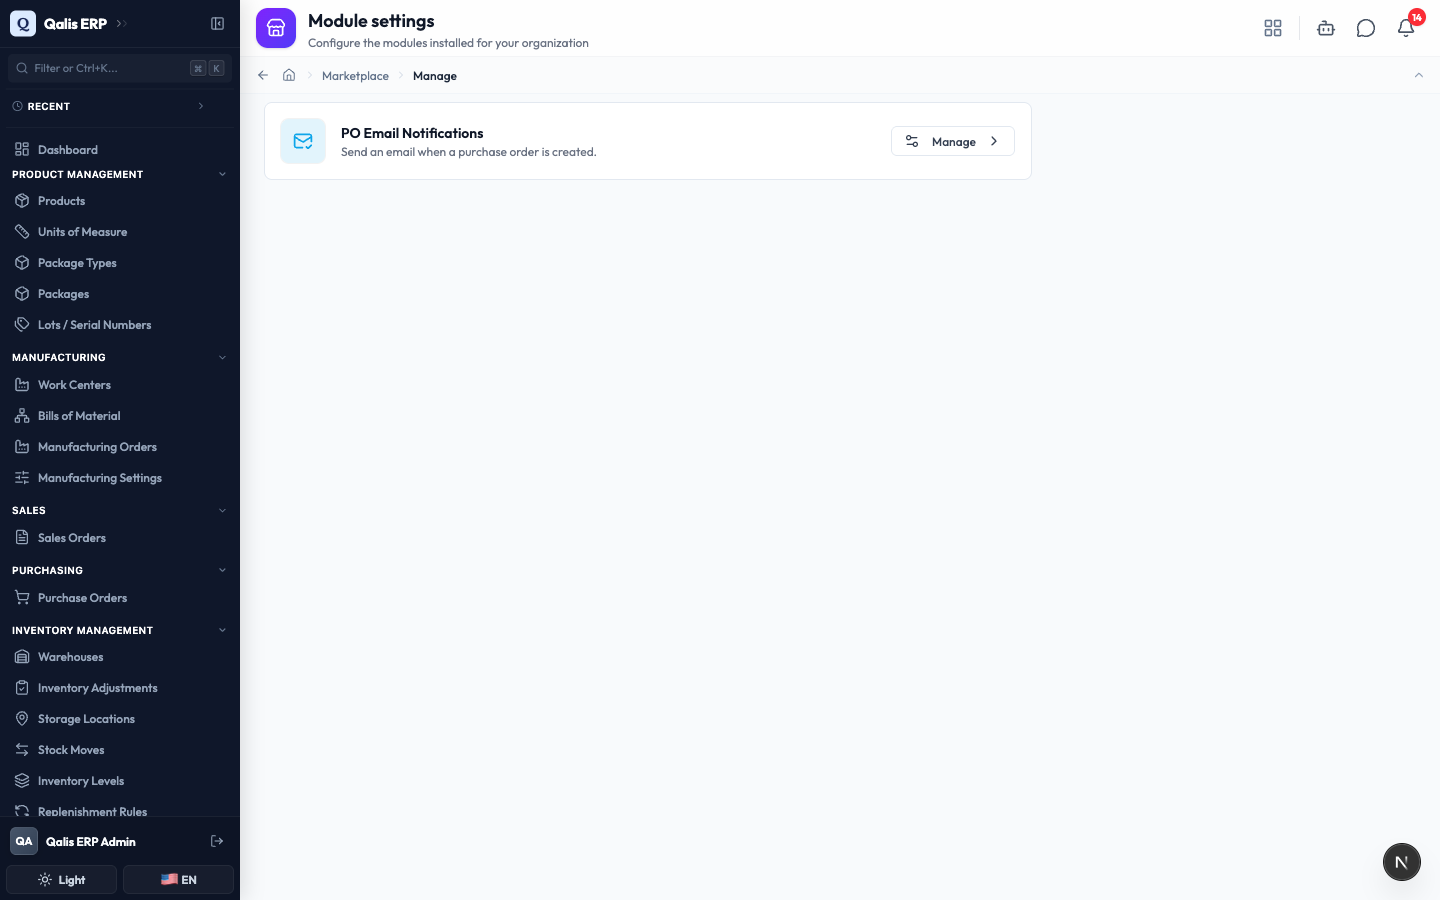
- Open the sidebar, go to Administration, and click Marketplace. Then click Module settings in the top right. (You can also click Manage settings on any module's detail page.)
- The Module settings page lists every installed module that has settings. Click Manage next to the one you want.
- The settings page opens with the module's options, grouped under a clear heading. Change whatever you need. The values you set during install are already filled in.
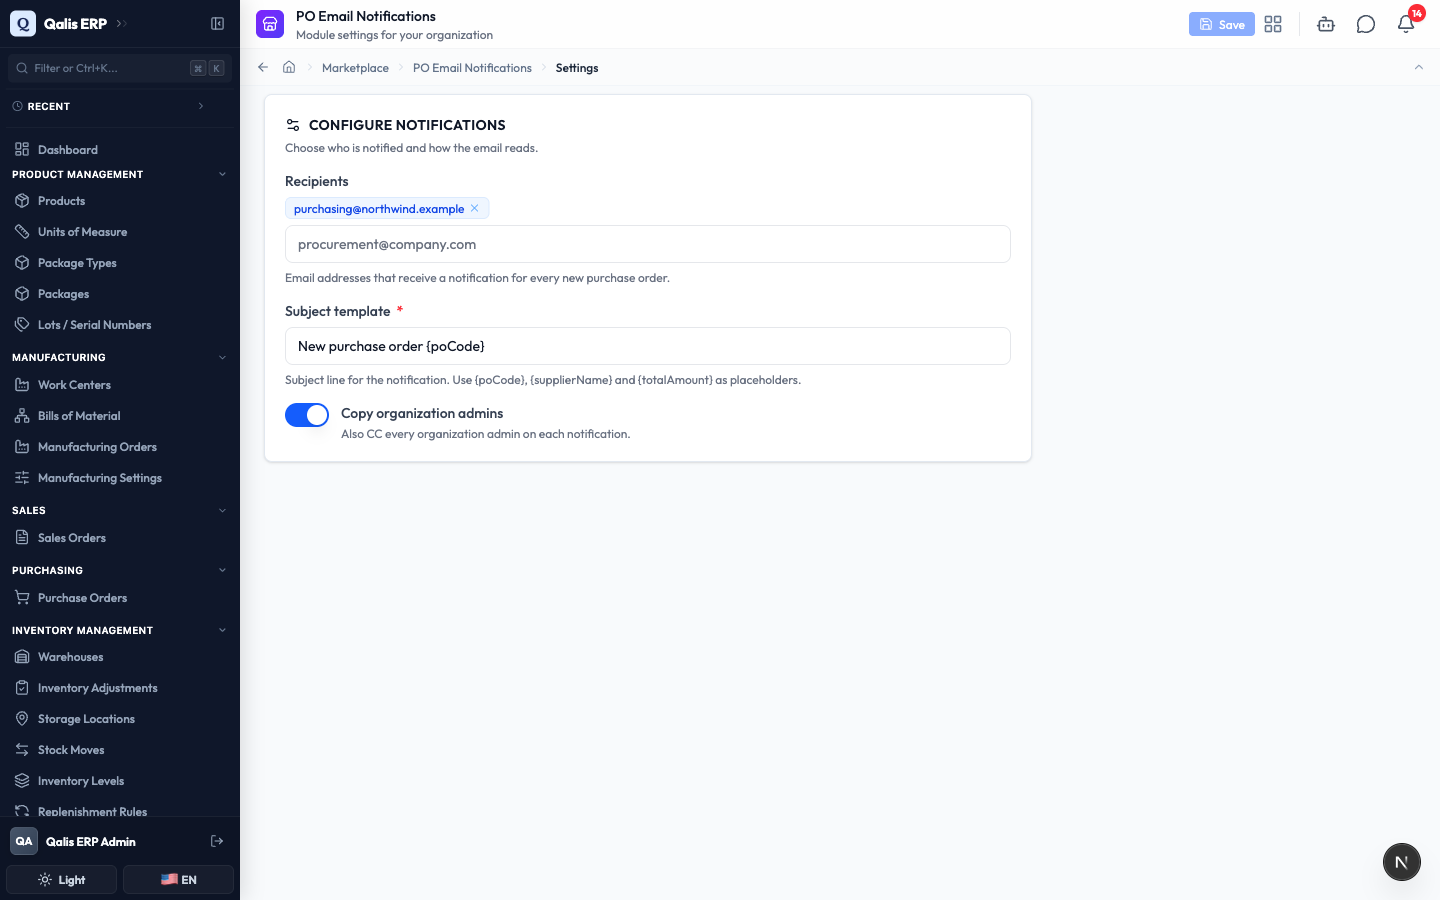
- Click Save in the top right. A short message confirms the change, and the Save button greys out again until your next edit.
The Save button stays inactive until you actually change something, so you always know whether you have unsaved edits.
Pause, resume, or remove a module
When you no longer need a module, you do not have to delete anything. You can pause it for a while, then resume it, or remove it entirely. All three keep your data safe.
On an installed module's detail page, the top right shows the actions you can take: Manage settings, Suspend, and Uninstall.
Pause a module
Suspending hides a module from everyone in your organization without removing it. This is handy when you want to switch a feature off temporarily.
- Click Suspend. A confirmation explains that members will lose access until you resume it, and that the data and settings are kept.
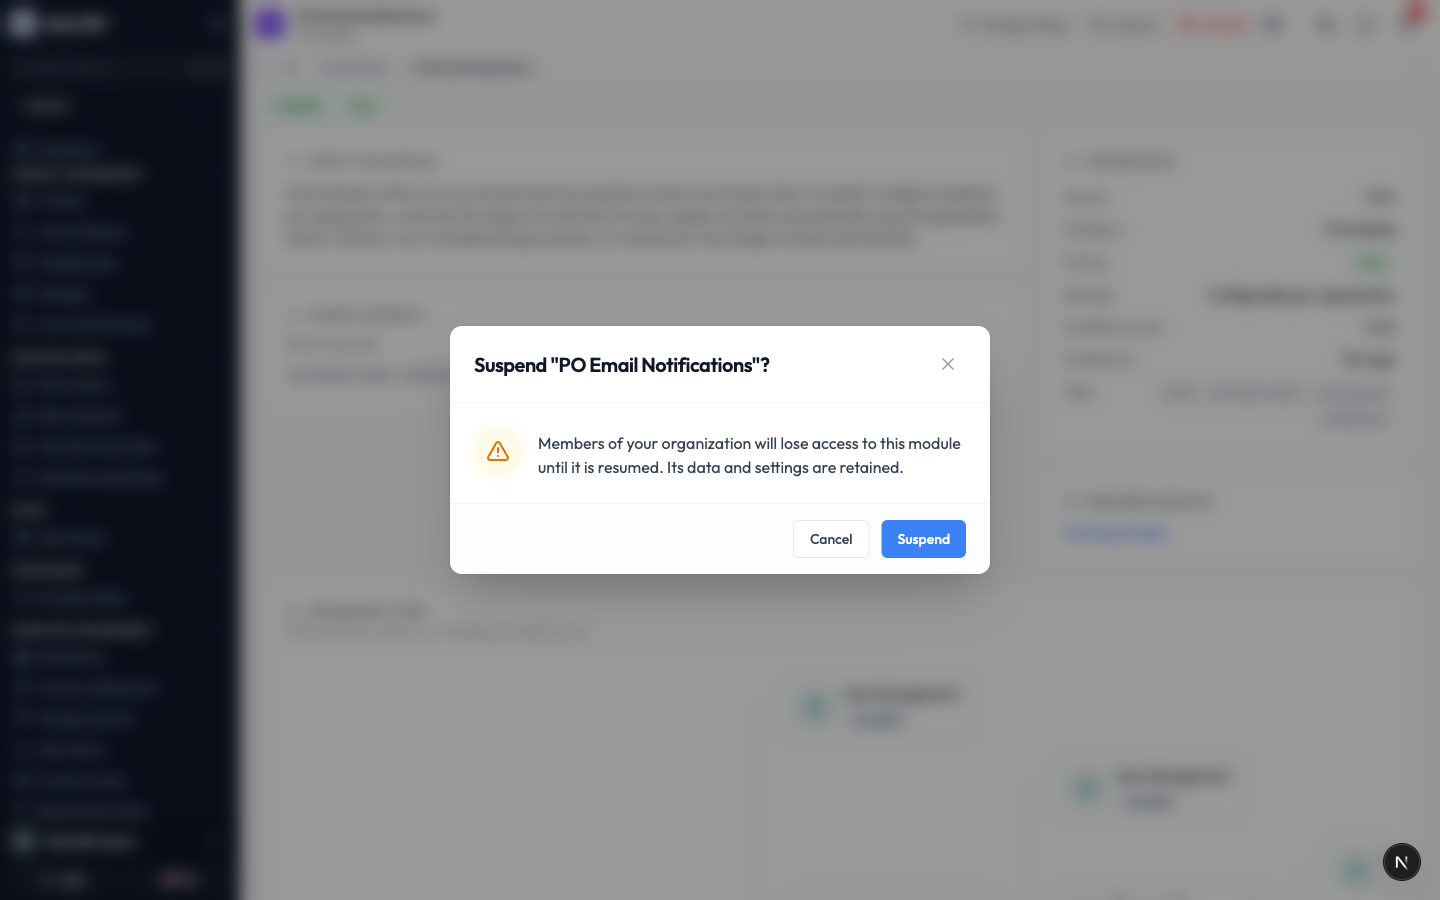
- Click Suspend to confirm. The module now shows a yellow Suspended badge, and the Suspend button is replaced by Resume.
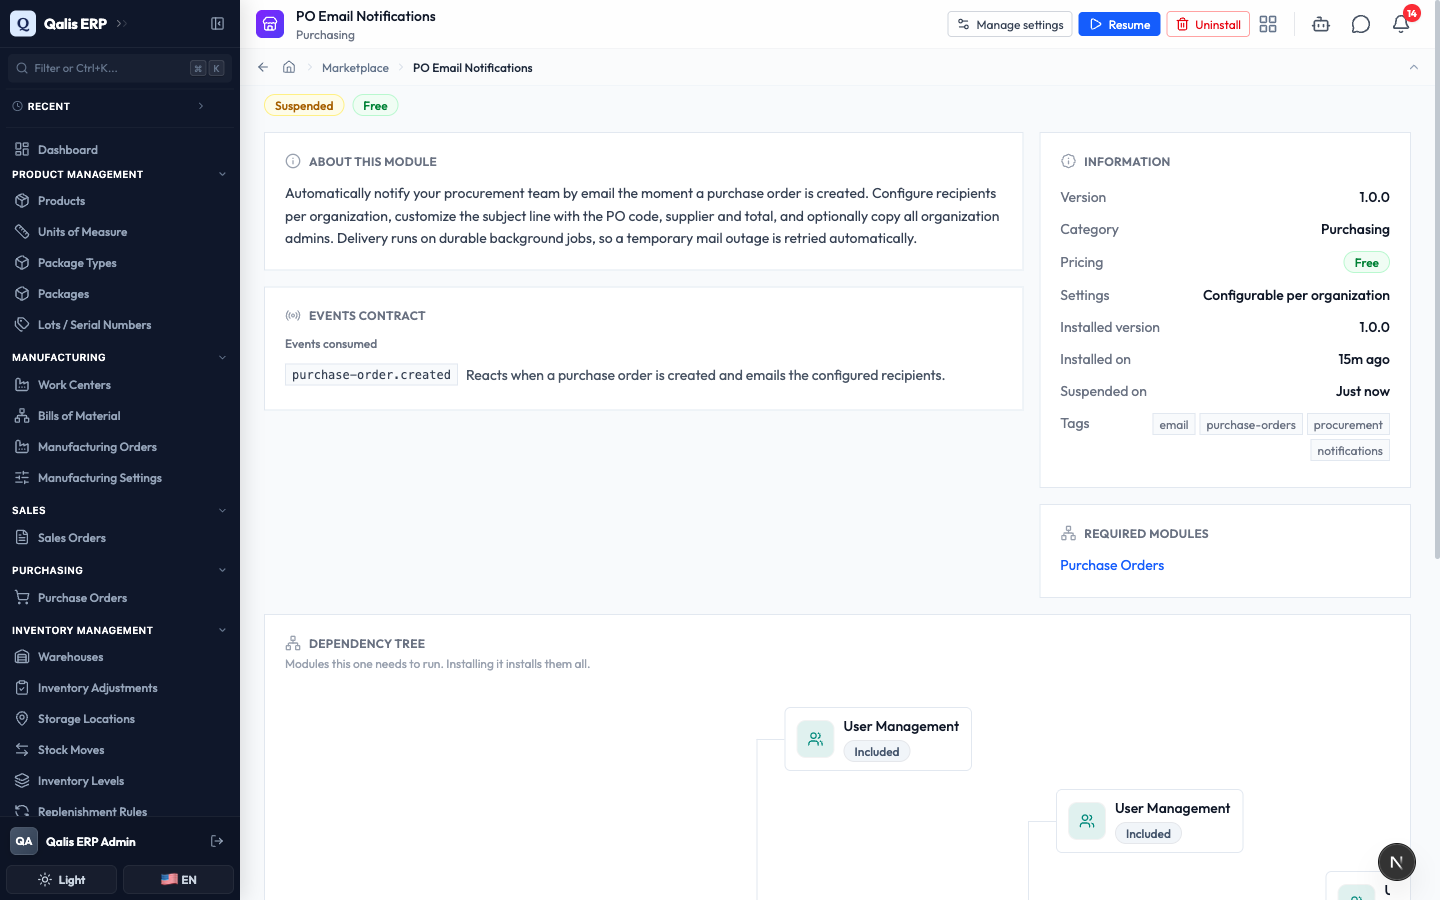
To switch it back on, click Resume. The module becomes active again immediately, with all its settings just as you left them.
You can still open and edit a suspended module's settings. Your changes apply the moment you resume it.
Remove a module
Uninstalling turns a module off and takes it out of the navigation. Your records are not deleted, so you can always add the module back later.
- Click Uninstall. A confirmation explains that members lose access right away, and that the data and settings are retained and restored if you reinstall.
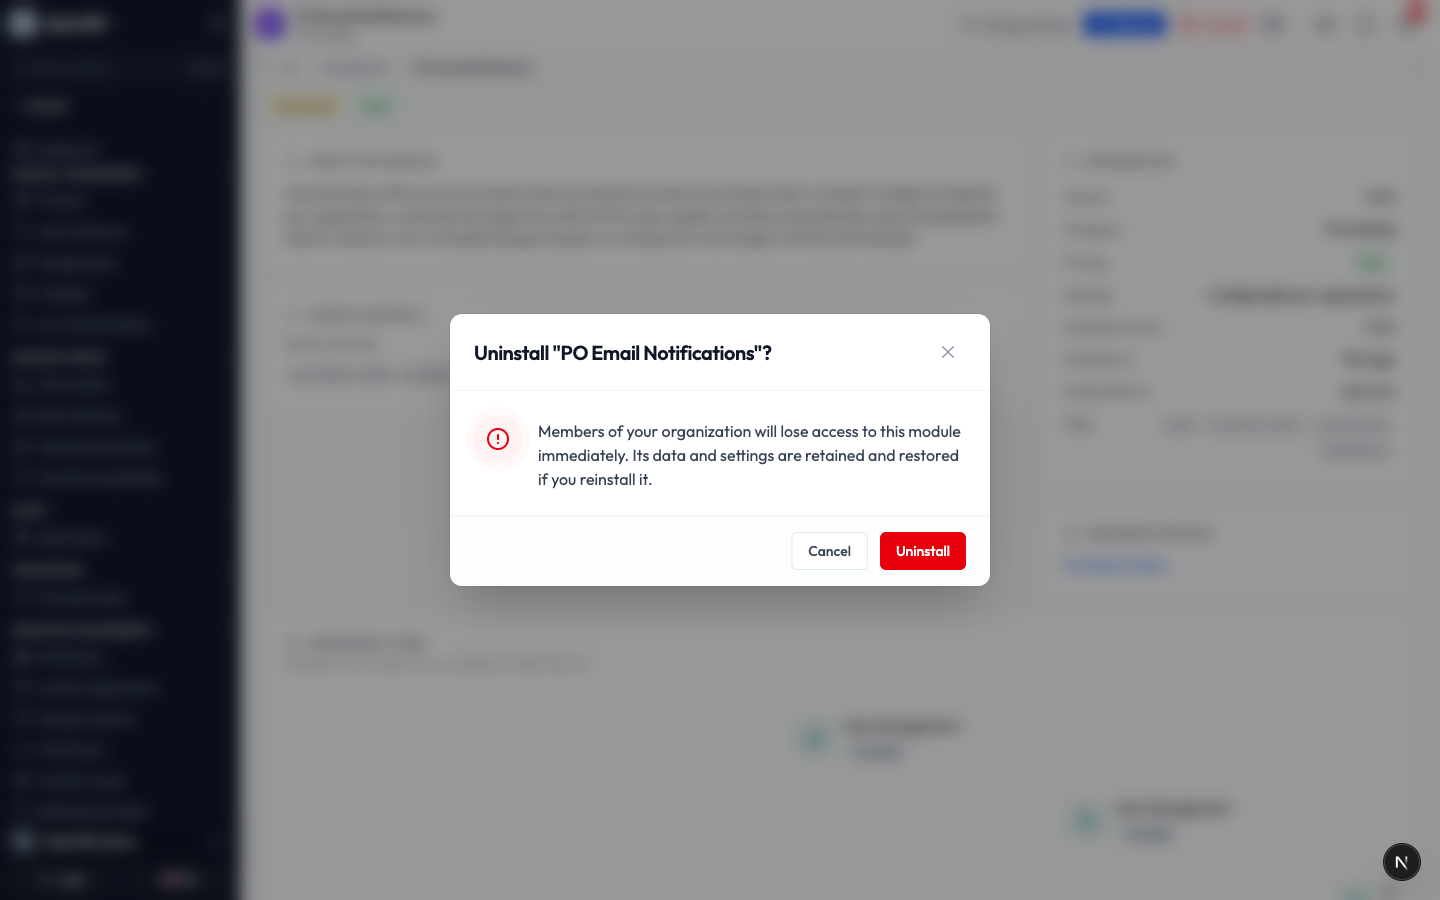
- Click Uninstall to confirm. The module returns to the catalog as Not installed, ready to be added again whenever you need it.
Because removing a module keeps its data, there is no risk in turning something off to tidy up your sidebar. If you change your mind, reinstalling brings everything back.
Good to know
- Module: a focused set of features you can turn on or off, like Purchase Orders or Inspections.
- Marketplace: the catalog of every module available to your organization, where you install and manage them.
- Installed, Suspended, Not installed: the three states a module can be in. Suspended means paused but still set up; Not installed means turned off and out of the navigation.
- Included module: a core part of the app that is always on and cannot be installed or removed.
- Dependency: another module that one module needs to work. Installing a module installs anything it depends on.
- Free and Paid: the price label on each module. Free modules cost nothing to add; paid modules are part of your plan.