Warehouses
Register each physical site where you keep stock, mark one as your default, and get a new warehouse ready to receive goods with a single switch.
Last updated on July 1, 2026
Warehouses is where you register every physical place your business keeps stock: a main building, a distribution center, a small satellite depot, or an archive site. Each warehouse holds its own storage locations (the zones, aisles, shelves, and bins inside it), and almost everything else in the system, from purchase orders to stock counts, points back at one of these warehouses. So this is usually one of the first things you set up. This guide covers the tasks you do most often: finding a warehouse in the list, creating a new one (and letting the system prepare it for receiving goods for you), reading a warehouse's details, and editing one.
Before you start
There is nothing you need to set up first, a warehouse is a starting point, not a follow-on record. You reach the module from the left sidebar under Inventory Management, then Warehouses.
One idea is worth knowing up front. A warehouse on its own is just an address. To actually receive and store goods, it needs storage locations inside it (a place to put received stock, a quarantine corner for rejects, and so on). The good news is that the create form can build that whole set for you automatically, which is covered below.
Find and browse your warehouses
Start here to see every warehouse you have and to zero in on the one you need.
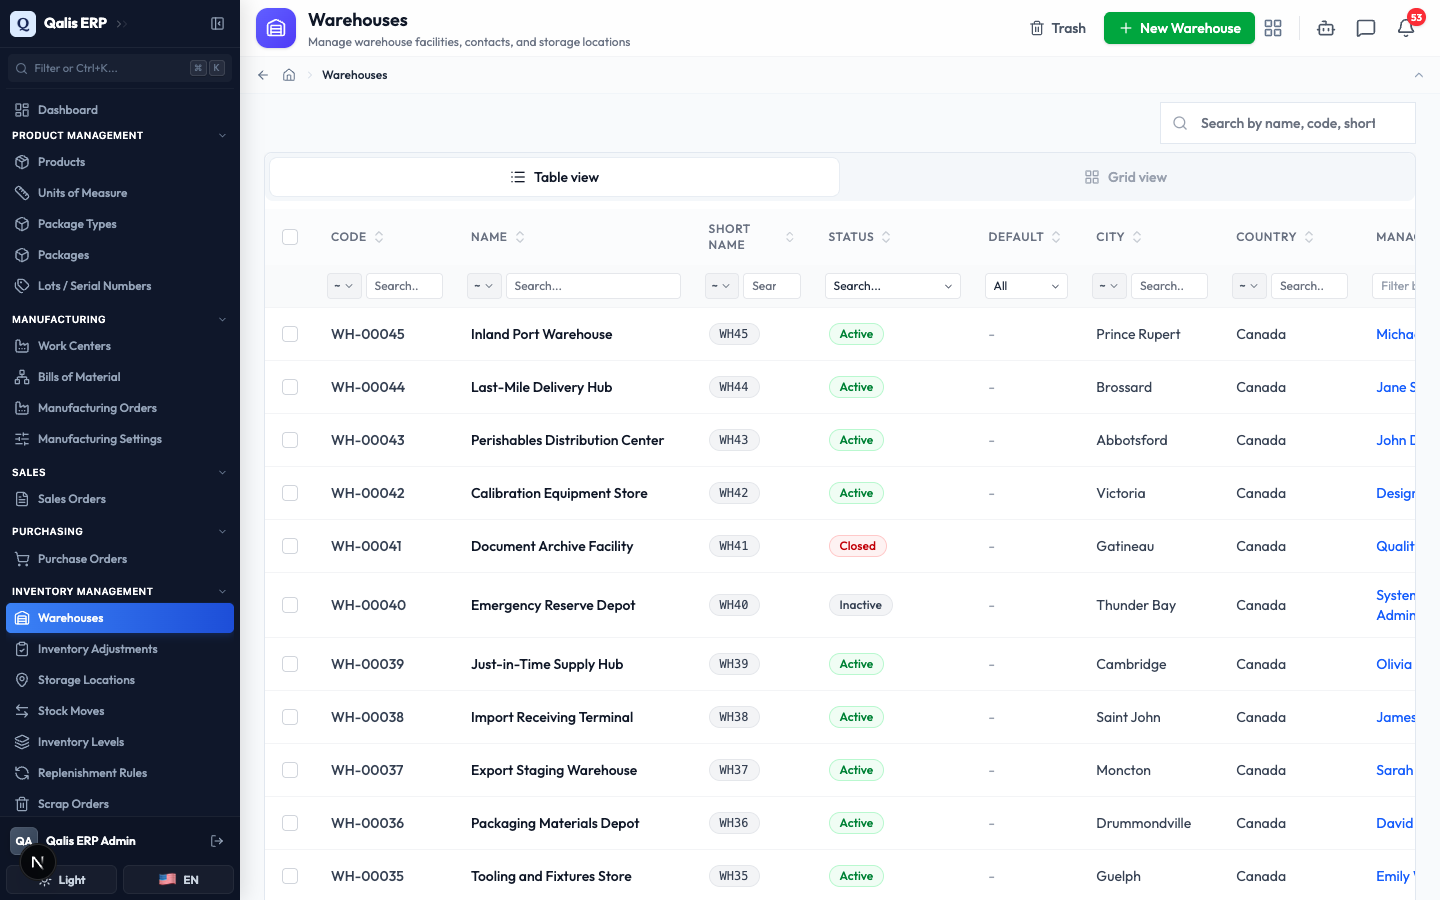
- Open Warehouses from the sidebar. At the top you will find the page title, a New Warehouse button, and a Trash button. Below that, two view buttons let you switch between Table view (the default) and Grid view. The table lists every warehouse with its Code, Name, Short Name, Status, Default, City, Country, and Manager.
-
Each row gives you the essentials at a glance. The Code (for example
WH-00045) is a reference the system assigns for you, the colored Status tag tells you whether the warehouse is Active, Inactive, Under Maintenance, or Closed, and the Manager links straight to that person's record. -
To find something fast, type in the Search by name, code, short name, city, or country box on the top right. The list filters as you type, so there is no need to press Enter. A banner appears showing your active search as a chip with an X to remove it, plus a Clear all button.
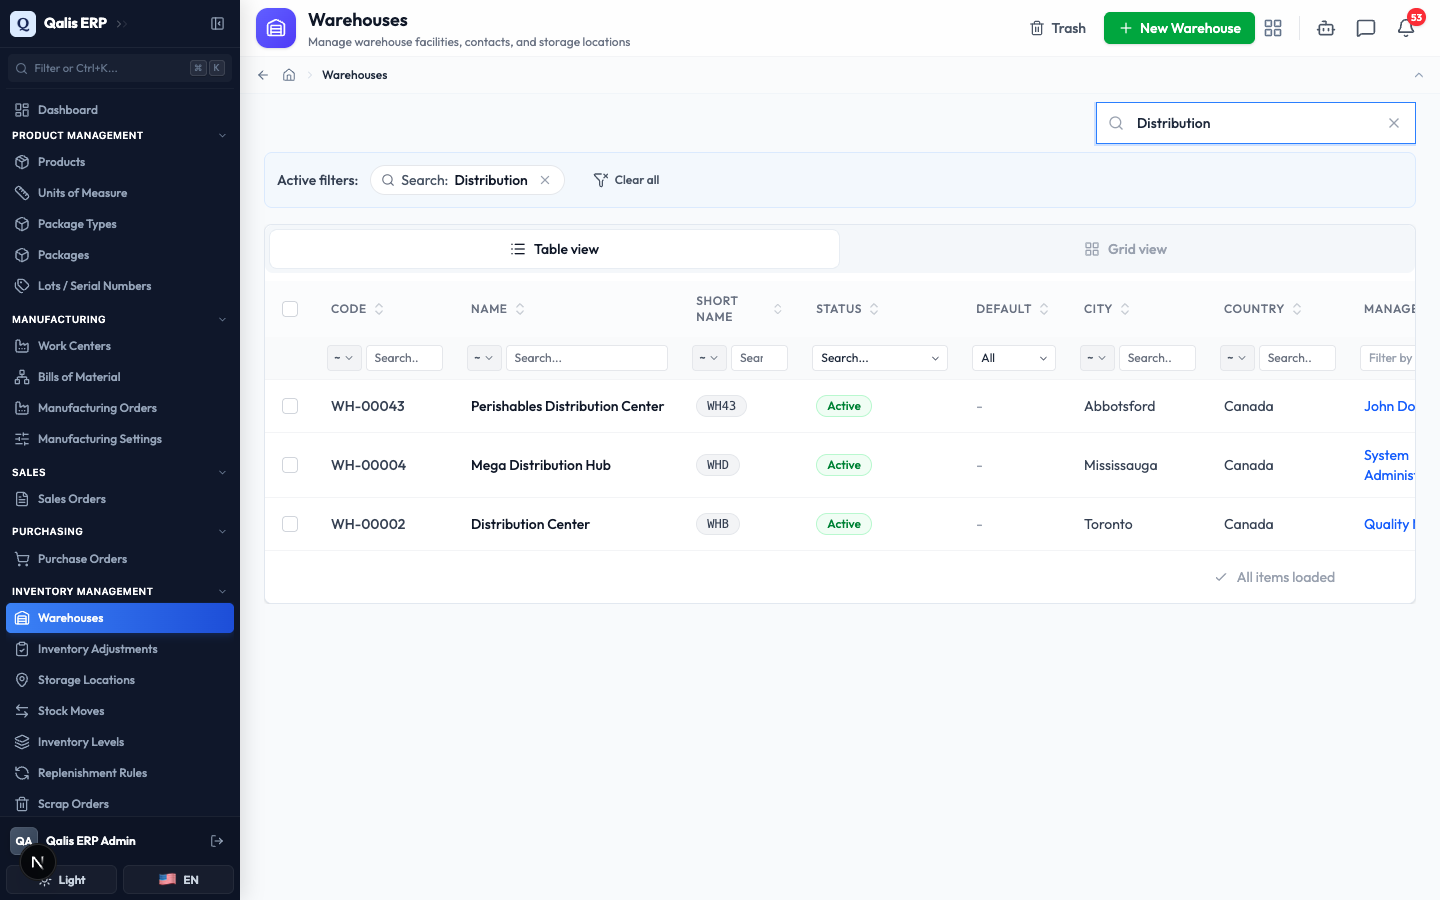
Each column header lets you sort (click it) and filter (use the small box just below it). Your search also shows up in the page address, so you can bookmark or share a filtered view.
Create a warehouse
This is the main walkthrough. It sets up a new site and, if you let it, prepares it to receive goods right away.
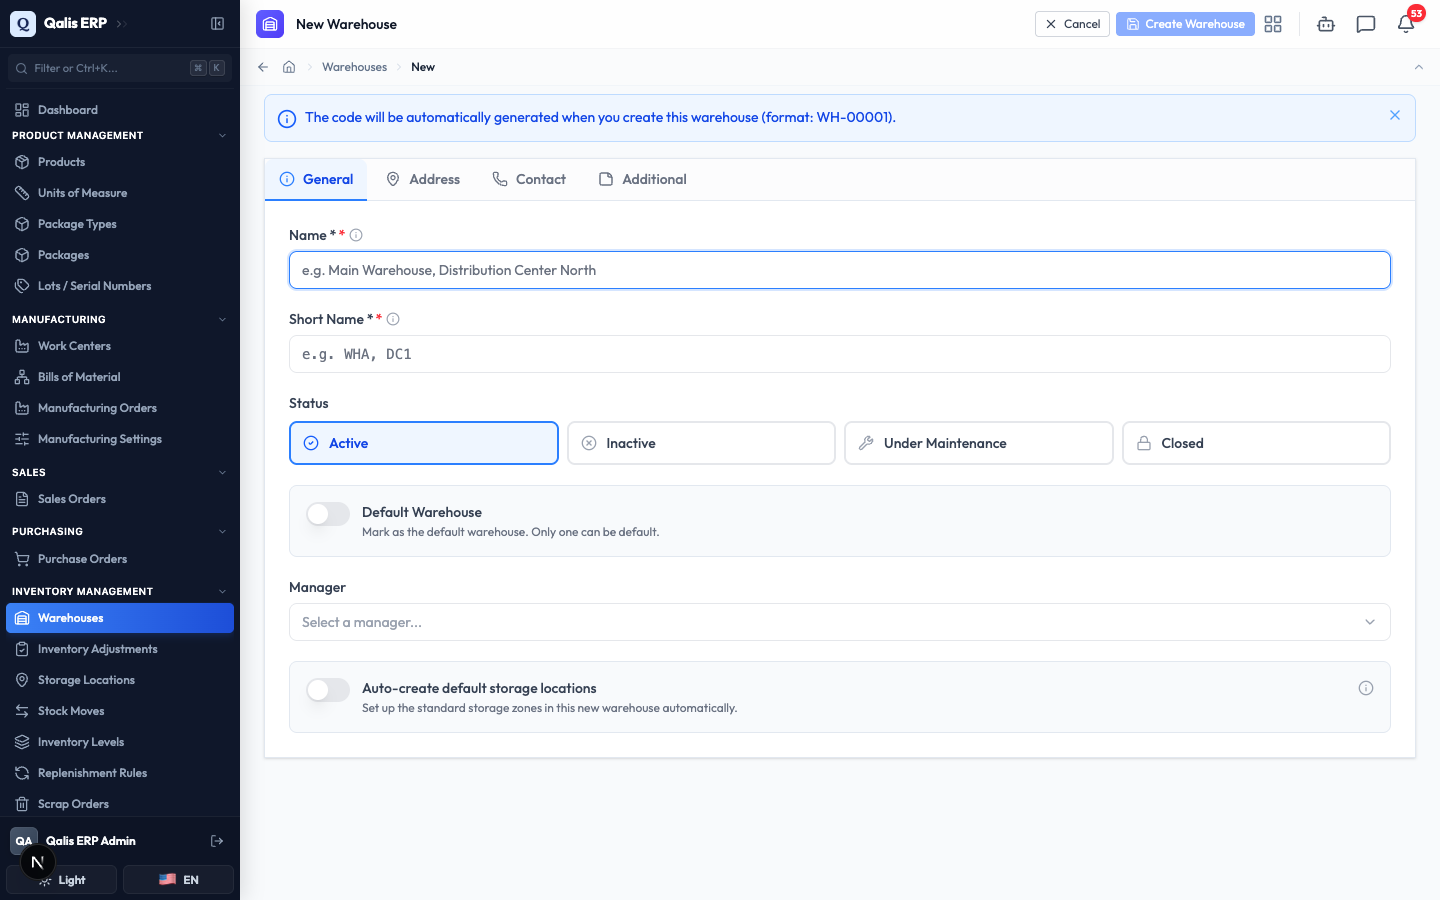
- Click the green New Warehouse button at the top right of the list. The form opens on the General tab. A note at the top reminds you that the warehouse Code is generated for you, so there is nothing to type there.
-
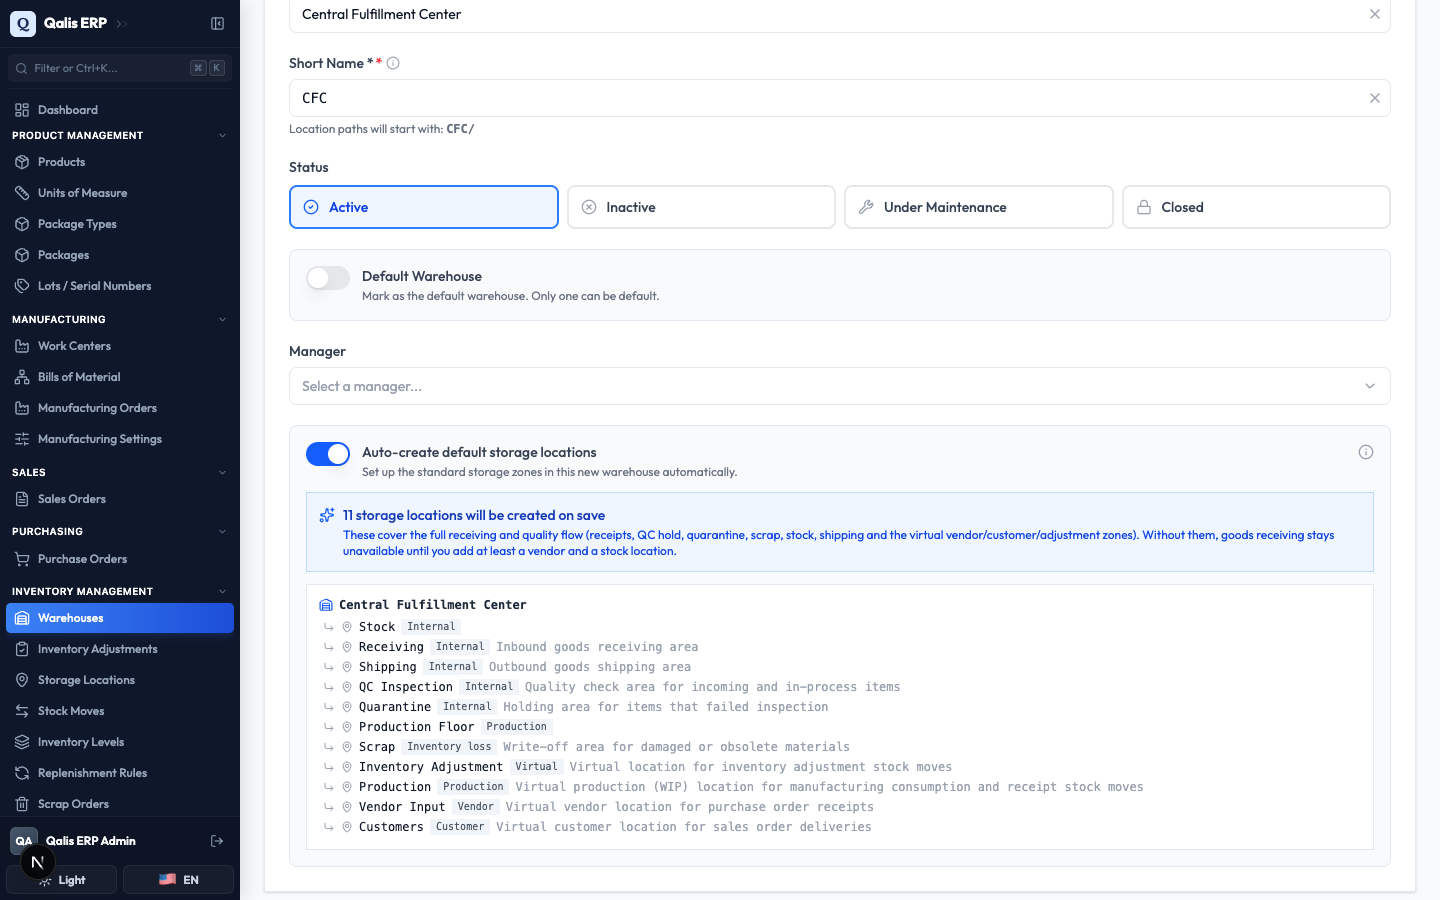
Enter the Name (required), for example
Central Fulfillment Center. Required fields are marked with an asterisk next to their label. -
Enter the Short Name (required), for example
CFC. This is a tag of 1 to 5 uppercase letters or numbers. It becomes the prefix for every storage location path inside this warehouse, so a hint shows you a live preview likeLocation paths will start with: CFC/. -
Pick a Status. Active is selected by default and is the right choice for a warehouse that is open for business. The four choices are explained at the end of this guide.
-
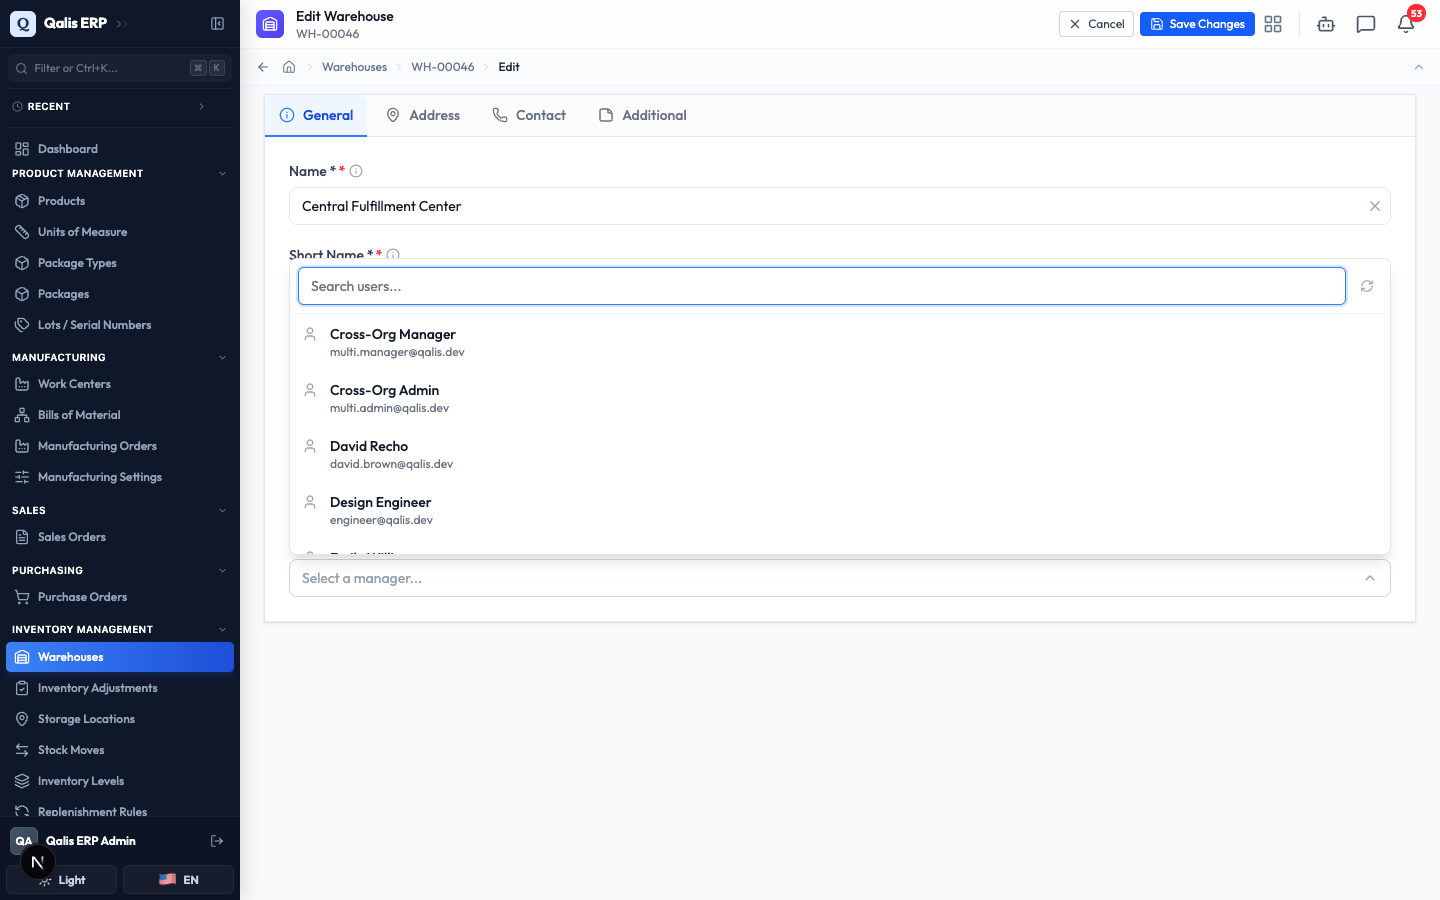
Optionally turn on Default Warehouse. Only one warehouse can be the default at a time, and the system uses it as the pre-selected warehouse in other parts of the app. You can also choose a Manager, the person responsible for the site, by clicking the field and searching for a user.
-
Now the switch that saves you the most work: Auto-create default storage locations. Turn it on and the form shows you exactly what it will build, a full set of receiving, quality, and stock zones, with a preview of every location and its type.
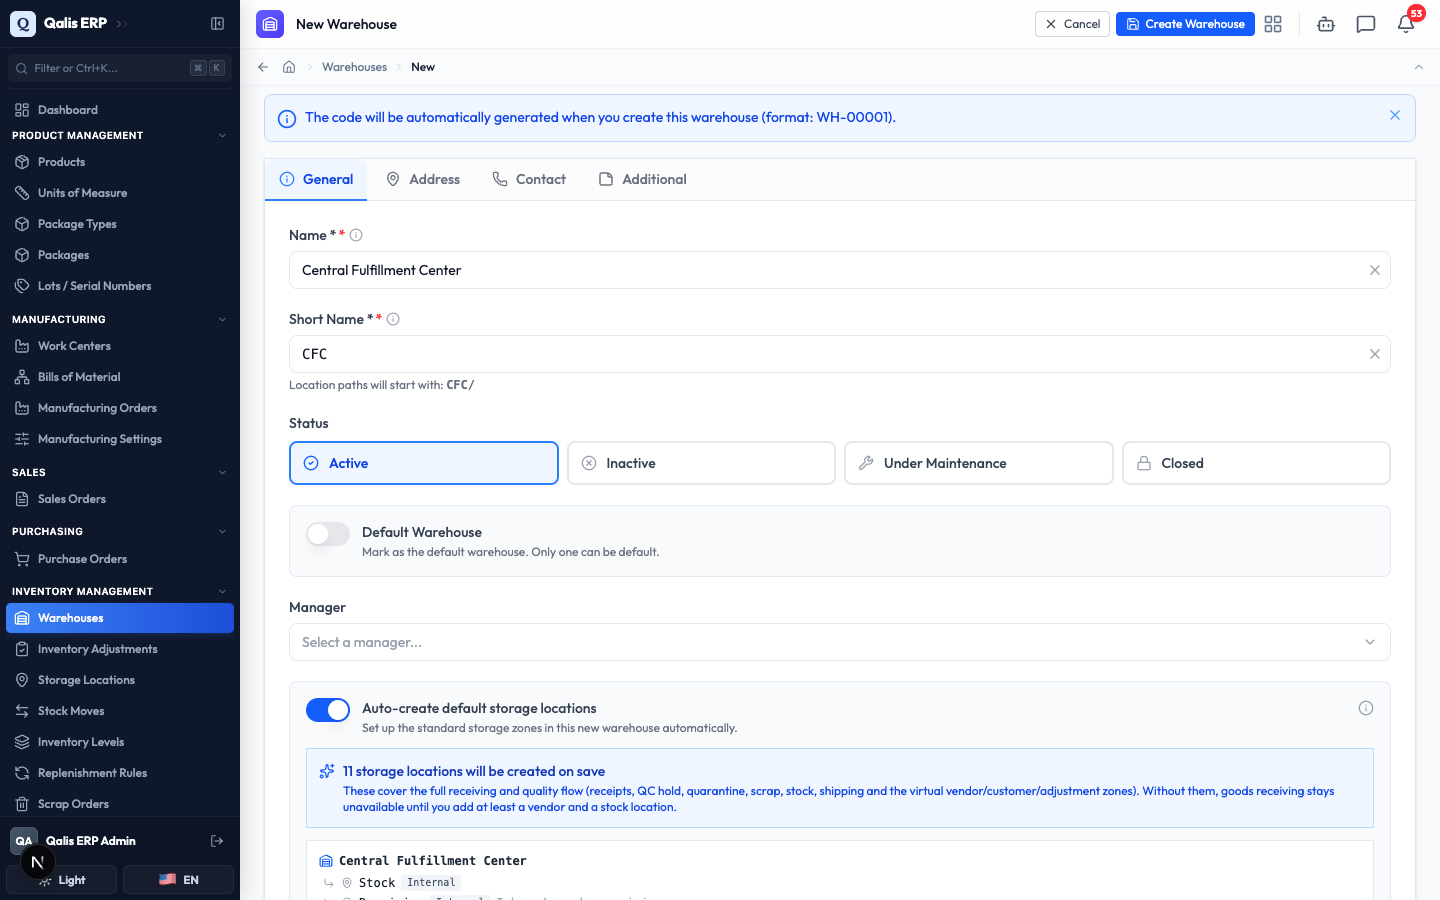
- The preview lists the standard zones this will create: a Stock area, a Receiving area, a Shipping area, a QC Inspection area, a Quarantine area, a Scrap area, and a few virtual zones the system uses behind the scenes for adjustments, production, vendor receipts, and customer deliveries.
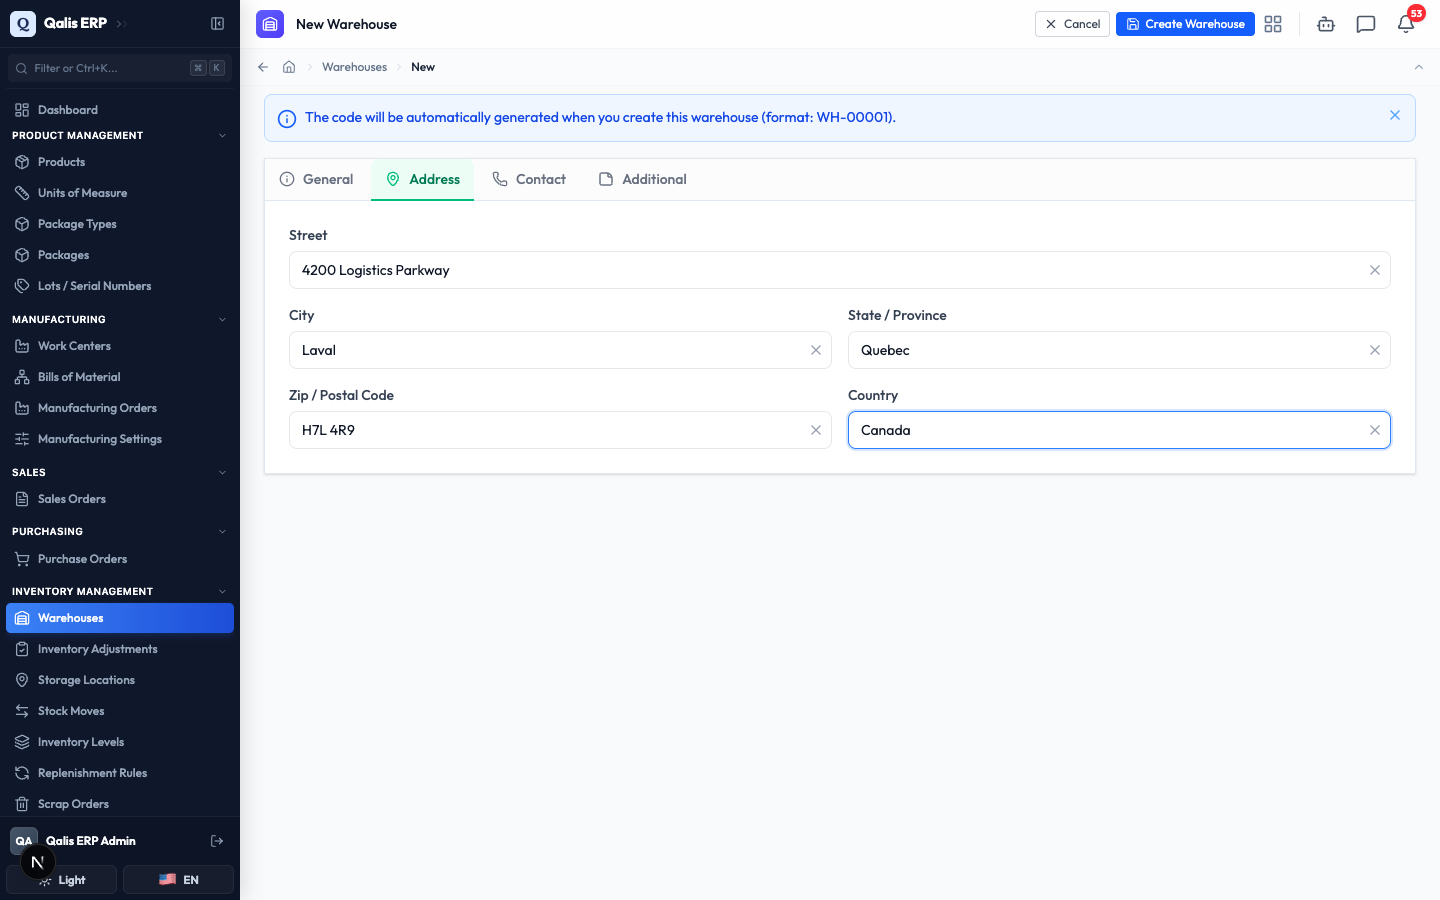
- If you know the site's address, open the Address tab and fill in the Street, City, State / Province, Zip / Postal Code, and Country. The Contact tab holds a contact email and phone, and the Additional tab holds free-form notes. All of these are optional.
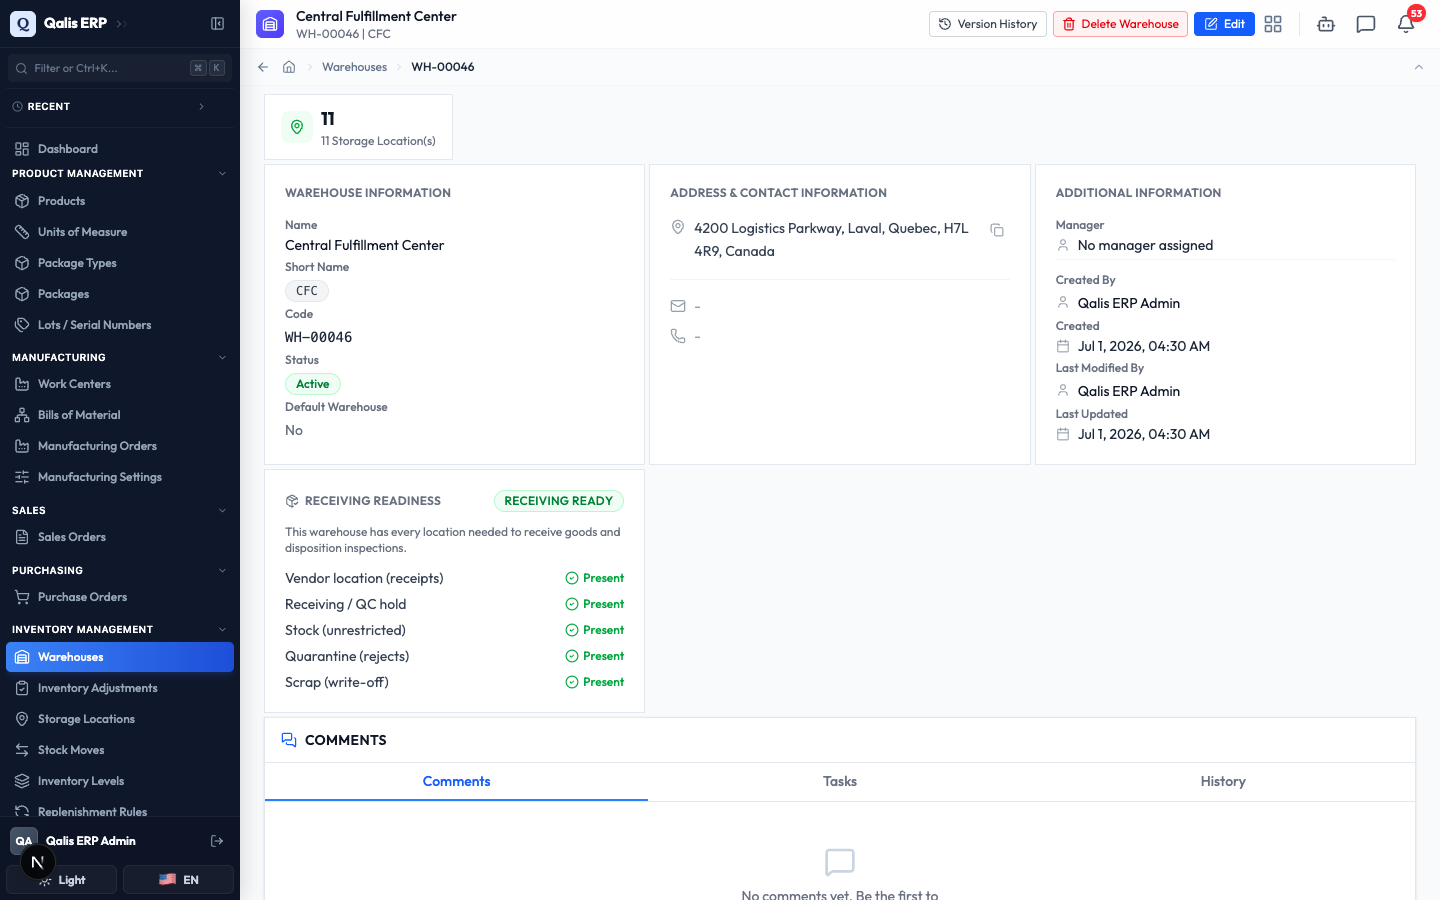
- Click Create Warehouse at the top right. The warehouse is saved, its default locations are built, and you land on its detail page with its new code (here
WH-00046) assigned.
If you leave the Auto-create default storage locations switch off, the warehouse is still created, but it starts empty. You then have to add storage locations yourself before it can receive goods. Turning the switch on is the quickest way to get a warehouse ready to use.
Open and read a warehouse's details
The detail page gathers everything about one warehouse in a single place. Open a warehouse by clicking its Code or Name in the list.
-
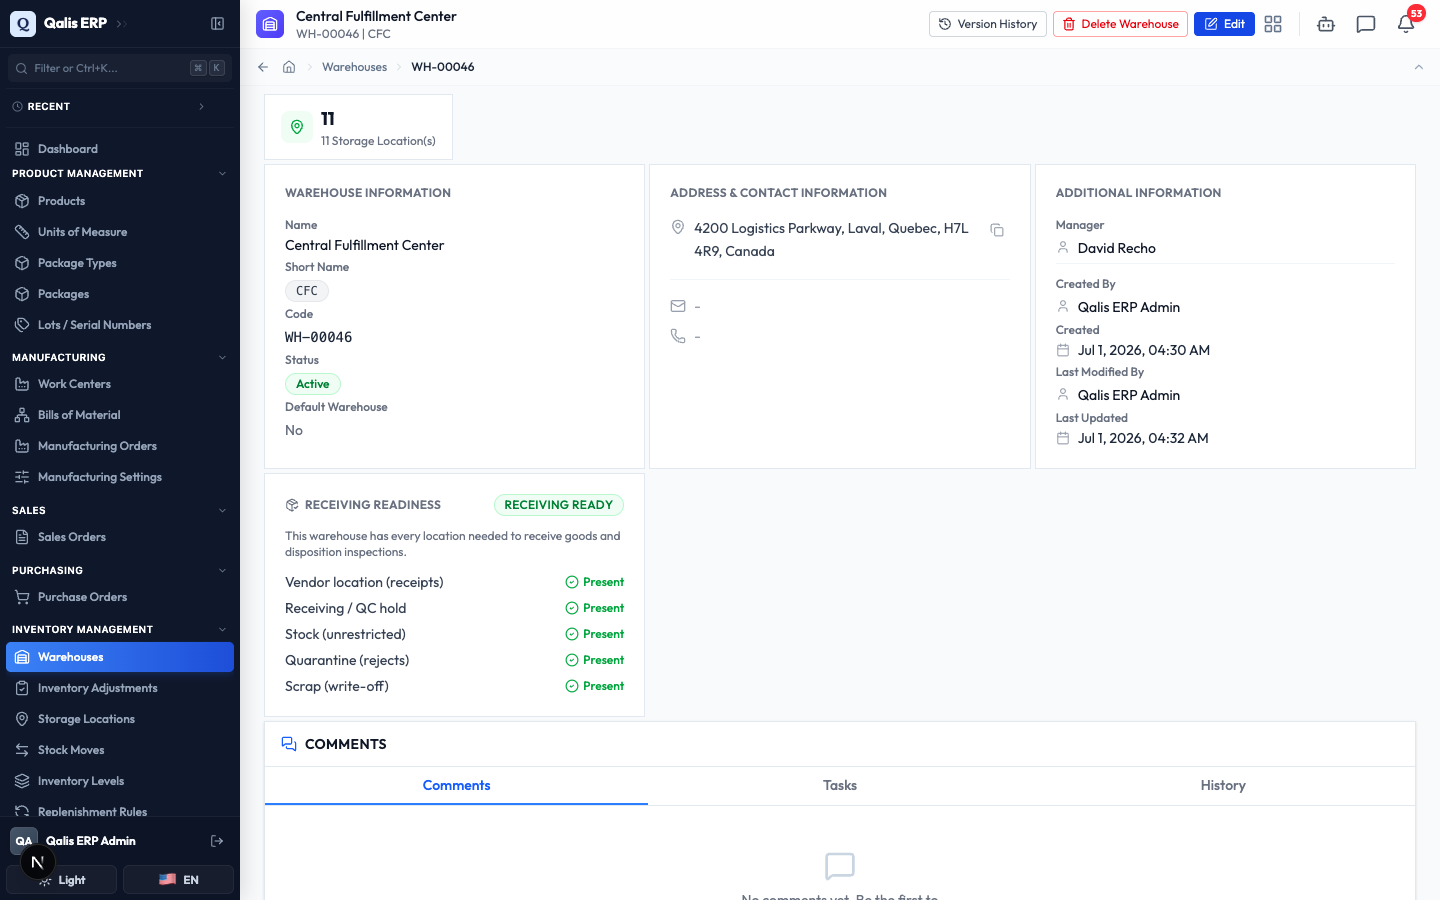
At the very top you see the warehouse name, its code and short name, and three buttons: Version History, Delete Warehouse, and Edit. Just below, a counter shows how many Storage Location(s) the warehouse holds.
-
Three cards break down the details. Warehouse Information shows the code, name, short name, status, and whether it is the default. Address & Contact Information shows the full address (with a copy button) plus the contact email and phone. Additional Information shows the manager, who created the warehouse and when, and who last changed it.
-
The Receiving Readiness card is the one to watch. It tells you, in plain terms, whether this warehouse has every location it needs to receive goods and handle inspections. A green Receiving ready badge means you are all set. Each role (a vendor location for receipts, a receiving or QC hold, a stock area, a quarantine spot for rejects, and a scrap area) is listed as either Present or Missing.
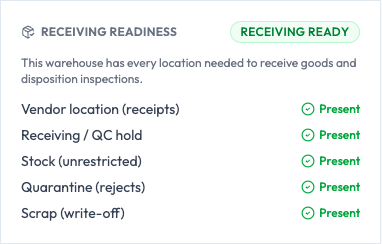
If any role shows Missing, the card gives you a Manage storage locations link that takes you straight to the right place to add what is needed. This is why turning on the auto-create switch when you create a warehouse is so handy: it fills in every one of these roles for you.
Edit a warehouse
Open a warehouse whenever its details change, for example to assign a manager, correct the address, or change its status.
- Open the warehouse and click Edit. The form opens with everything already filled in, across the same four tabs you saw when creating it. The auto-create switch does not appear here, since it only applies to brand-new warehouses.
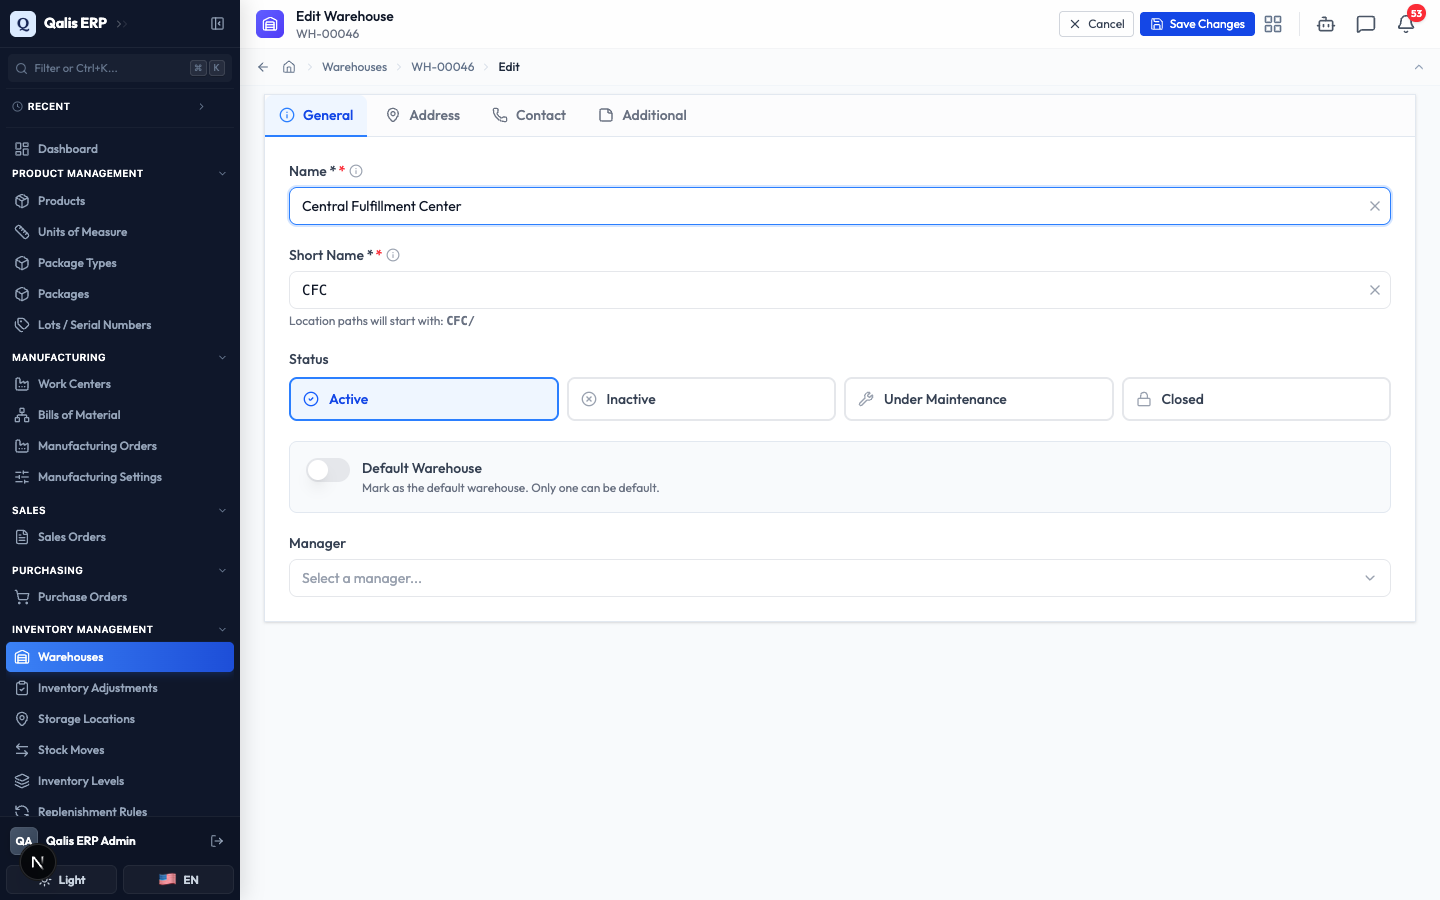
- Make your change. In this example, the Manager field is used to put someone in charge. Click the field, search by name or email, and pick the person.
- When you are done, click Save Changes. The warehouse is saved and you return to its detail page, where your change is shown and the Last Updated time is refreshed.
Every change is recorded. Use the Version History button at the top of the detail page to see what changed, who changed it, and when, and to roll back to an earlier version if you need to.
Good to know
A few terms and rules you will meet on these screens, in plain words:
- Status: a warehouse can be Active (open and working normally), Under Maintenance (still able to take in new storage locations and purchase orders, but flagged as needing attention), Inactive (paused, and blocked from new operations), or Closed (shut down, and blocked from new operations). Set a warehouse back to Active before you try to add new locations or orders to it.
- Short Name: a short tag of 1 to 5 uppercase letters or numbers, like
CFCorWHA. It is the prefix for the paths of every storage location inside the warehouse, so keep it recognizable. - Default warehouse: the one warehouse marked as your default. Only one can hold that flag at a time, and the system uses it as the pre-filled choice in other parts of the app. Setting a new default automatically removes the flag from the old one.
- Receiving readiness: a quick health check that tells you whether a warehouse has all the storage locations it needs to receive and inspect goods. Turning on Auto-create default storage locations when you create the warehouse makes it ready in one step.
- Deleting: deleting a warehouse moves it to the Trash, where you can restore it later, and any storage locations inside it move to the trash with it. You cannot move a warehouse to the trash while it still holds stock on hand or has open purchase orders, and you cannot permanently delete one that still has storage locations, inventory, or purchase orders pointing at it. Clear or reassign those first, and the warehouse can then be removed.