Non-Conformance Reports
Log a quality problem, investigate its root cause, decide what to do with the affected goods, and close it out with a clear record of who did what and when.
Last updated on June 29, 2026
A Non-Conformance Report, or NCR, is the record you open when something does not meet its requirements: a part is out of tolerance, a material is contaminated, a supplier sent the wrong revision, or a customer reports a fault. The NCR holds the whole story in one place: what went wrong, how serious it is, what caused it, what you did about it, and what it cost. Anyone can later open it and see exactly how the problem was handled. This guide walks you through the things you do most often: finding an NCR, raising one, reading it, investigating and closing it, raising a corrective action (a CAPA) from it, and exporting your list.
You reach the module from the left sidebar under Non-Conformance, then NCR. The page is titled Non-Conformance Reports.
Before you start
An NCR can stand on its own, so there is little to set up first. A few things are worth knowing:
- Only five things are required to raise one: a Title, a Type, a Severity, a Category, and a Source. Everything else you can fill in later as the investigation moves along.
- An NCR can link to other records in Qualis, all optional but useful: the Product affected, the Supplier it came from, and the Client it concerns (handy for customer complaints).
- You do not type an NCR number. Qualis assigns one automatically (like NCR-2026-00046) when you save.
- Closing an NCR is a controlled step. When you set its status to Closed, Qualis sends it for approval first (usually to a Quality Manager). It actually closes once that person approves. This is covered near the end of the guide.
Find and browse your NCRs
Start here to see everything you have and zero in on the one you need.
- Open NCR from the sidebar. Four summary cards across the top show your Total NCRs, how many are Open, how many are Critical, and how many are Pending Disposition (waiting on a decision). Below them, the table shows one row per NCR with its NCR Number, Title, Type, Severity, Status, Due Date, and more. The top right has a New NCR button and a Trash button for deleted records.
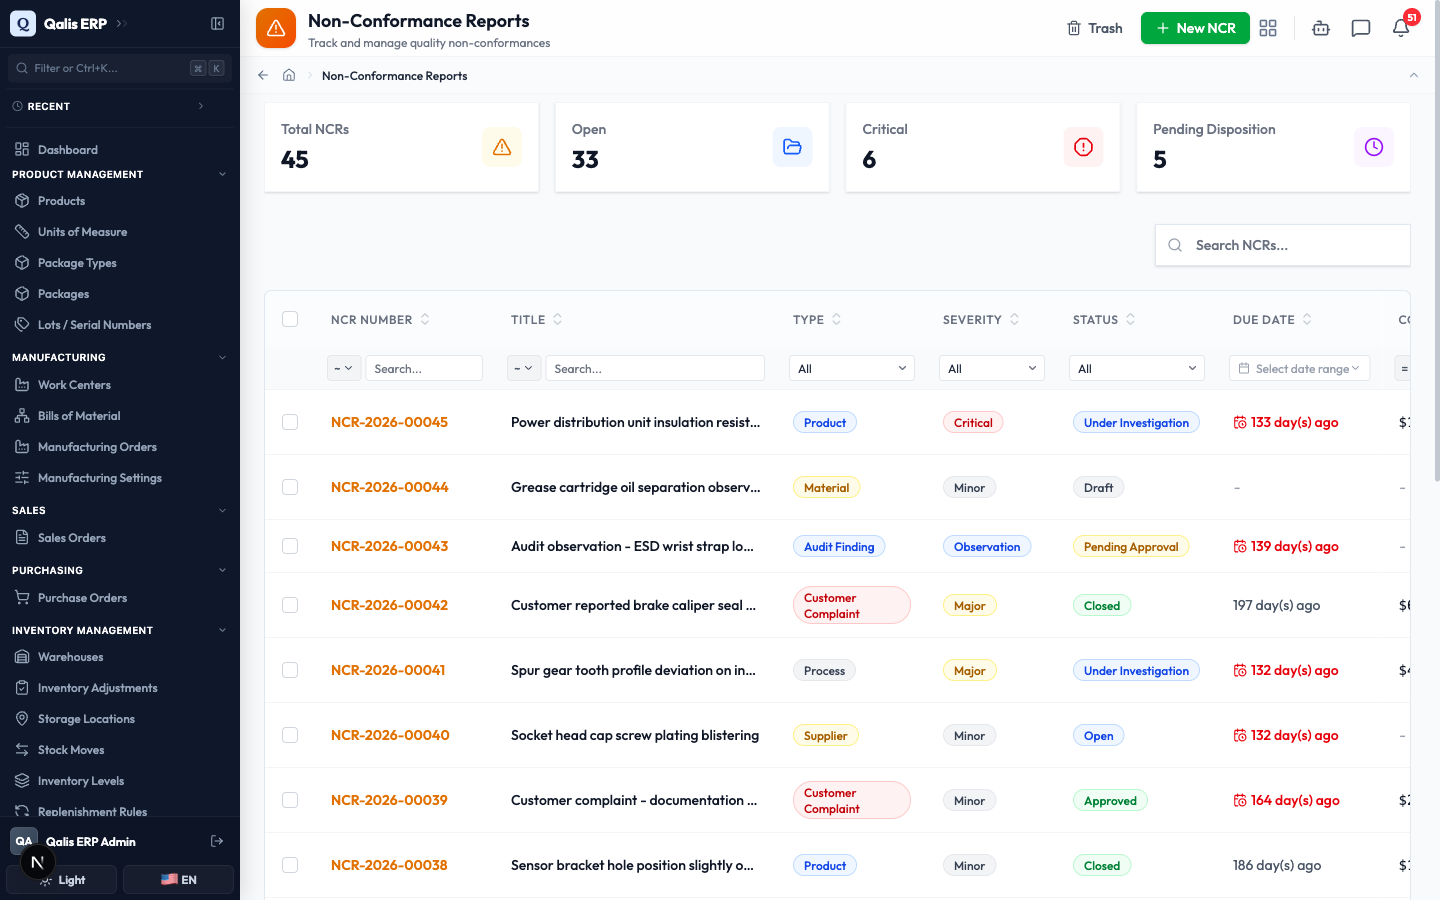
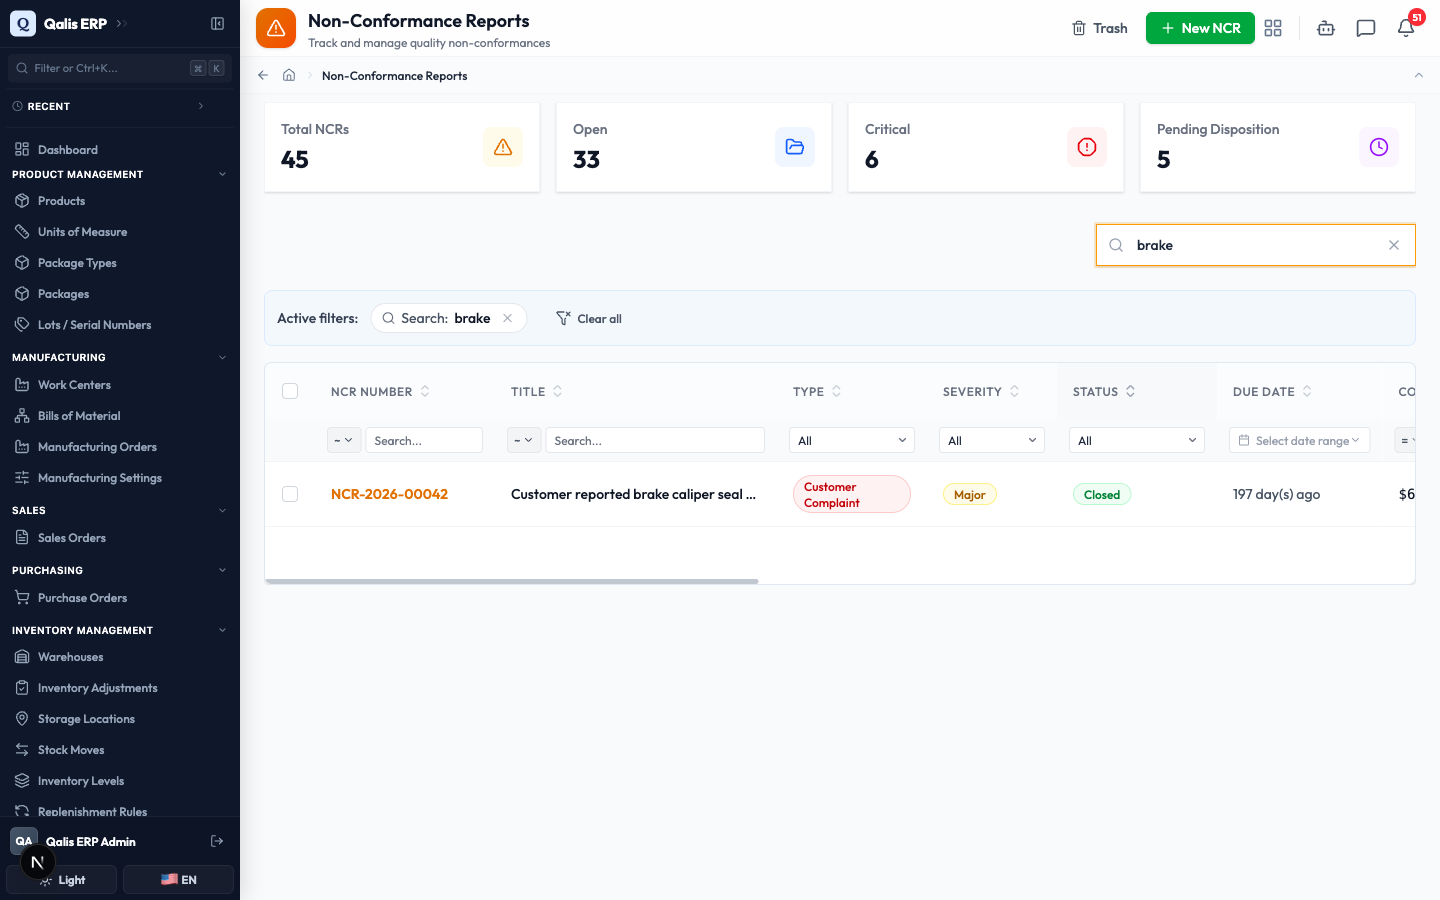
- To find one fast, type in the Search NCRs... box. The list filters as you type, so there is no need to press Enter. Search looks at the NCR number and the title.
- To see only certain NCRs, use the dropdowns under the column headings. For example, open the Severity filter and pick Critical to see only the most serious ones. You can filter the same way by Type and Status, or by a date range on the due date.
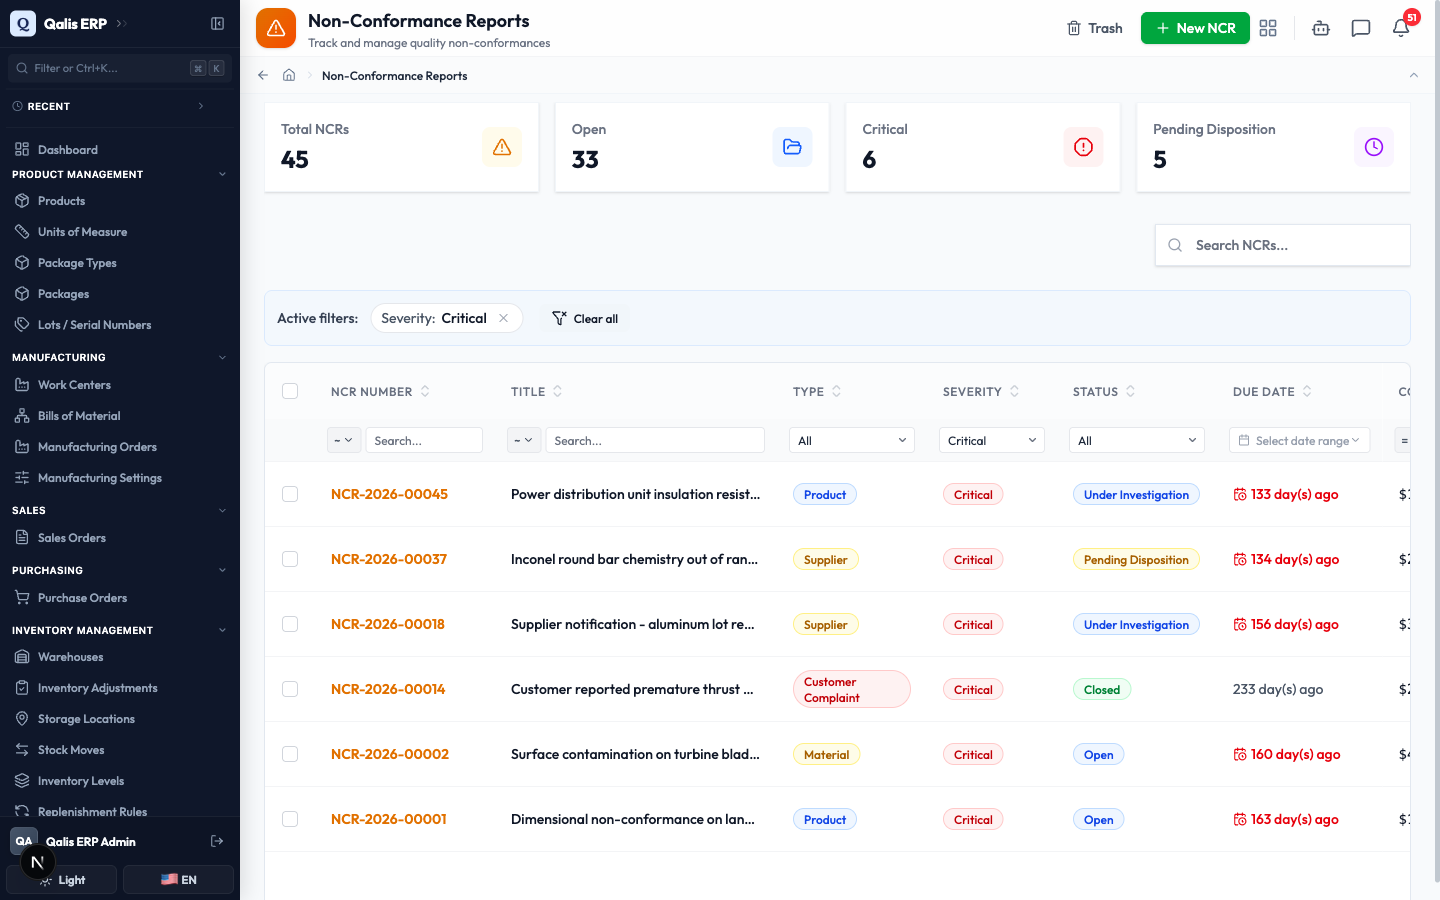
Whenever a filter is on, an Active filters banner appears showing what is applied. Click the small x on a filter to drop it, or Clear all to reset everything. The web address updates too, so you can bookmark or share a filtered view.
Create an NCR
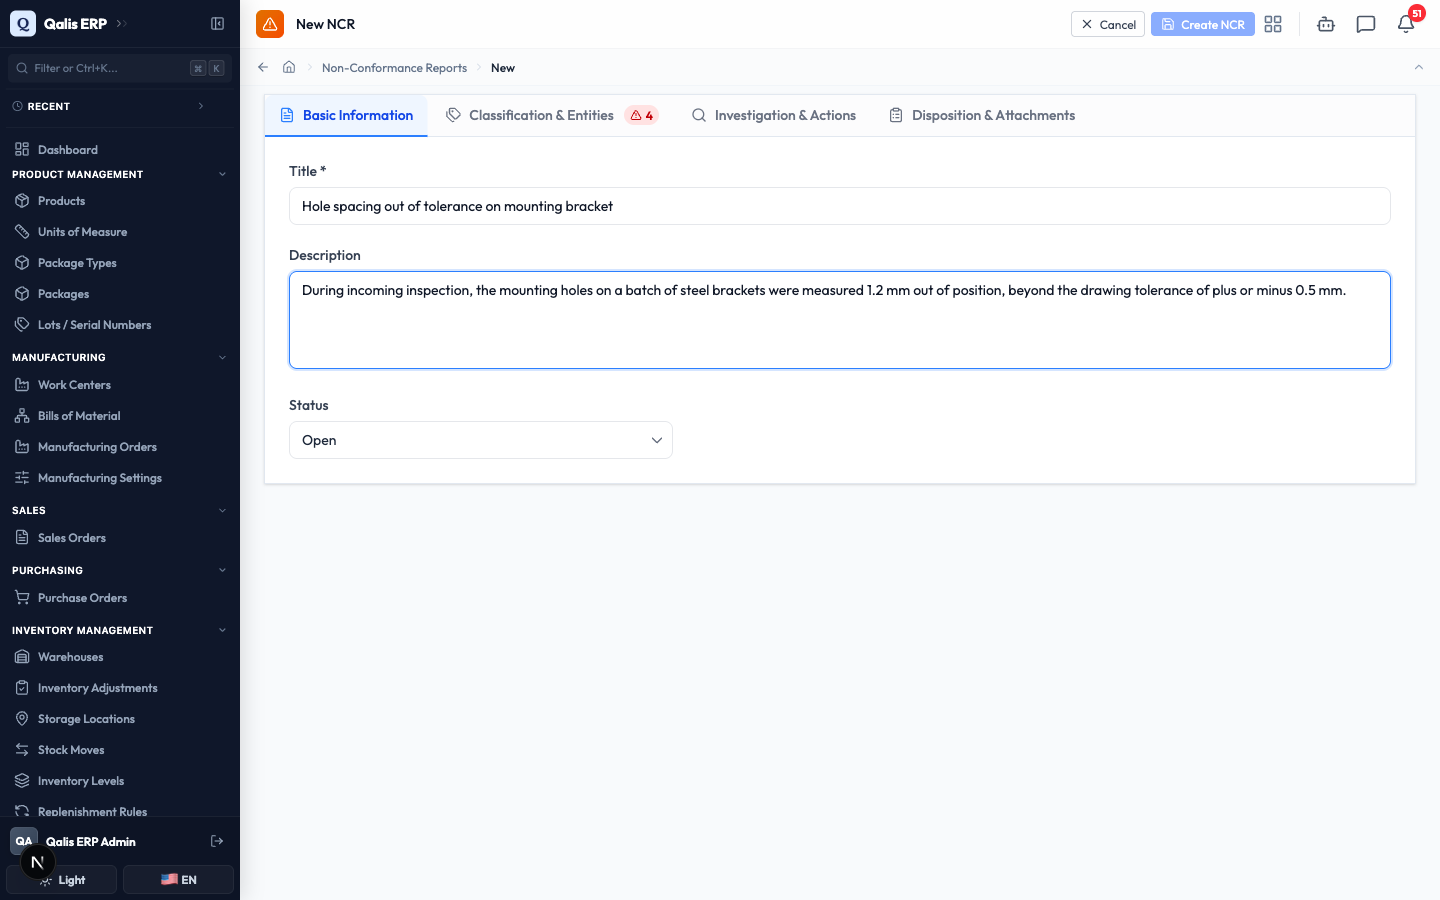
This is the main task: opening a new report for a problem you have found. The form is split into four tabs so you can fill it in one section at a time. A red dot with a number on a tab tells you how many required fields are still empty there.
Basic Information
- On the list, click New NCR at the top right.
- On the Basic Information tab, type a short Title that says what is wrong, for example "Hole spacing out of tolerance on mounting bracket". This is required.
- Add a longer Description if you want, explaining what you saw and measured.
- Leave Status on Draft if you are still writing it up, or set it to Open once the NCR is ready for someone to act on.
Classification & Entities
-
Open the Classification & Entities tab. Fill in the four required choices that describe the problem:
- Type: what kind of non-conformance it is (Product, Process, Material, Supplier, Customer Complaint, Audit Finding, or Other).
- Severity: how serious it is (Critical, Major, Minor, or Observation).
- Category: the nature of the defect (Dimensional, Visual, Functional, Documentation, Packaging, Contamination, or Other).
- Source: where it was found (Incoming Inspection, In-Process, Final Inspection, Customer Return, Audit, Supplier Notification, or Other).
-
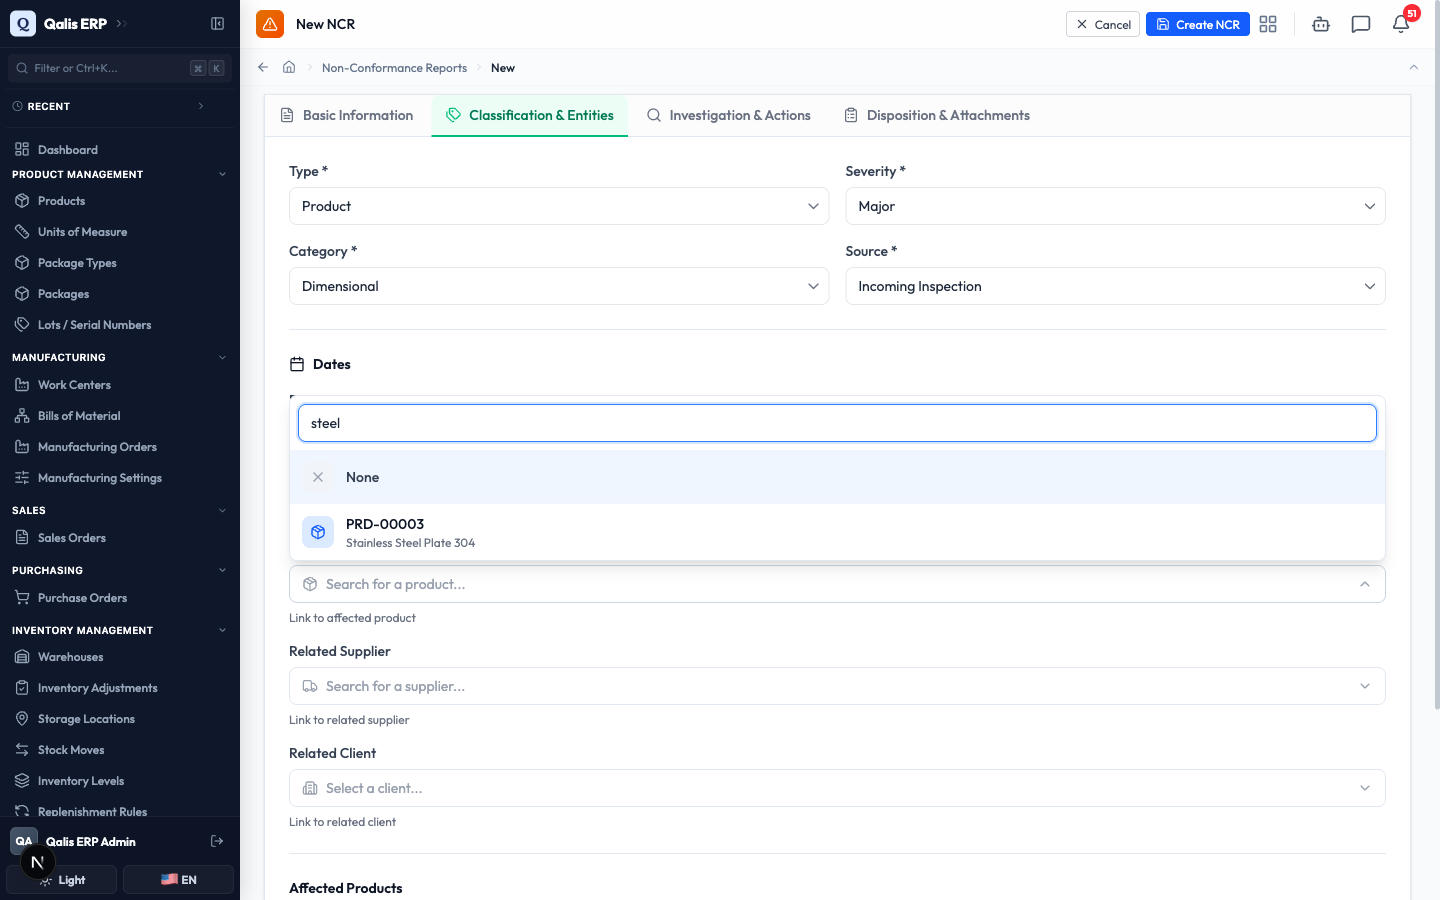
Under Related Entities, link the records this NCR concerns. To link the affected item, click Related Product, type to search, and pick it from the list. You can link a Related Supplier and a Related Client the same way. All three are optional.
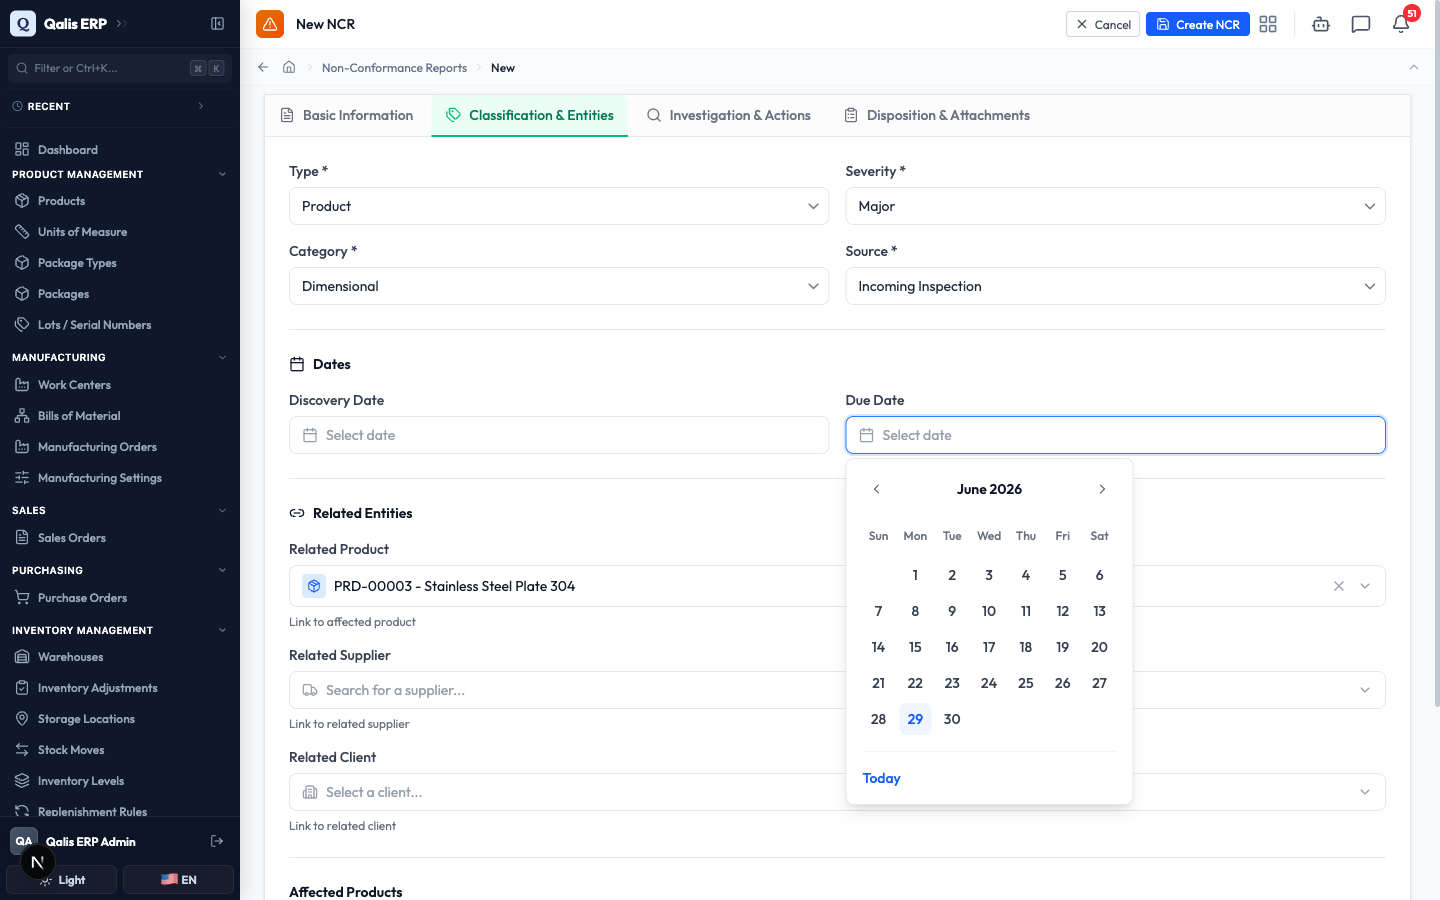
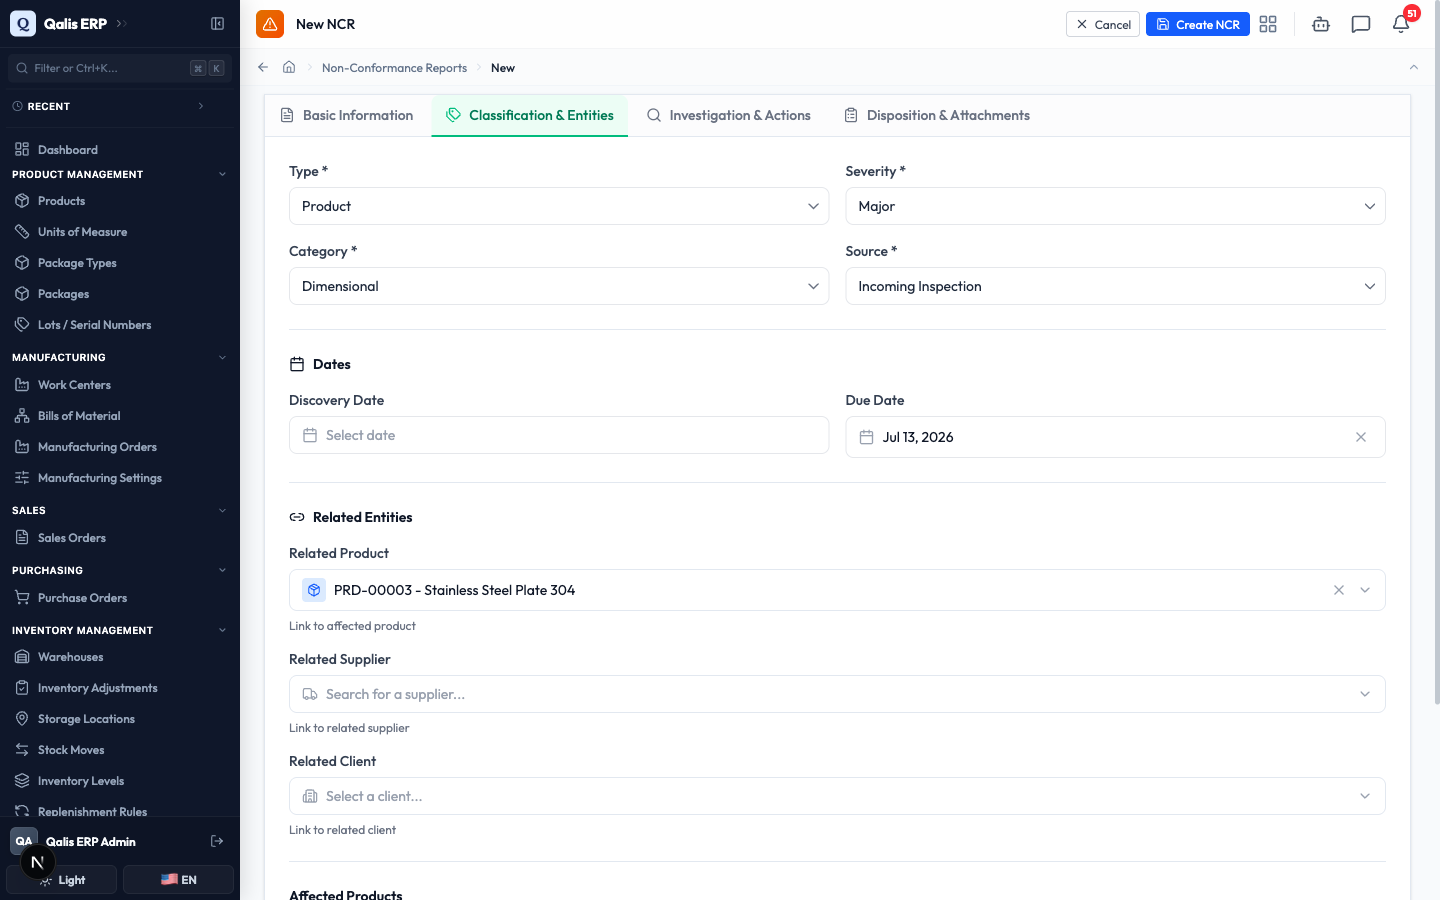
- In the Dates section, set a Due Date if the NCR needs to be resolved by a certain day. Click the field, then pick a date on the calendar. The calendar has a Today button for quick selection.
- When the four required choices are filled, the red dot on the tab disappears.
- When you are ready, click Create NCR at the top right.
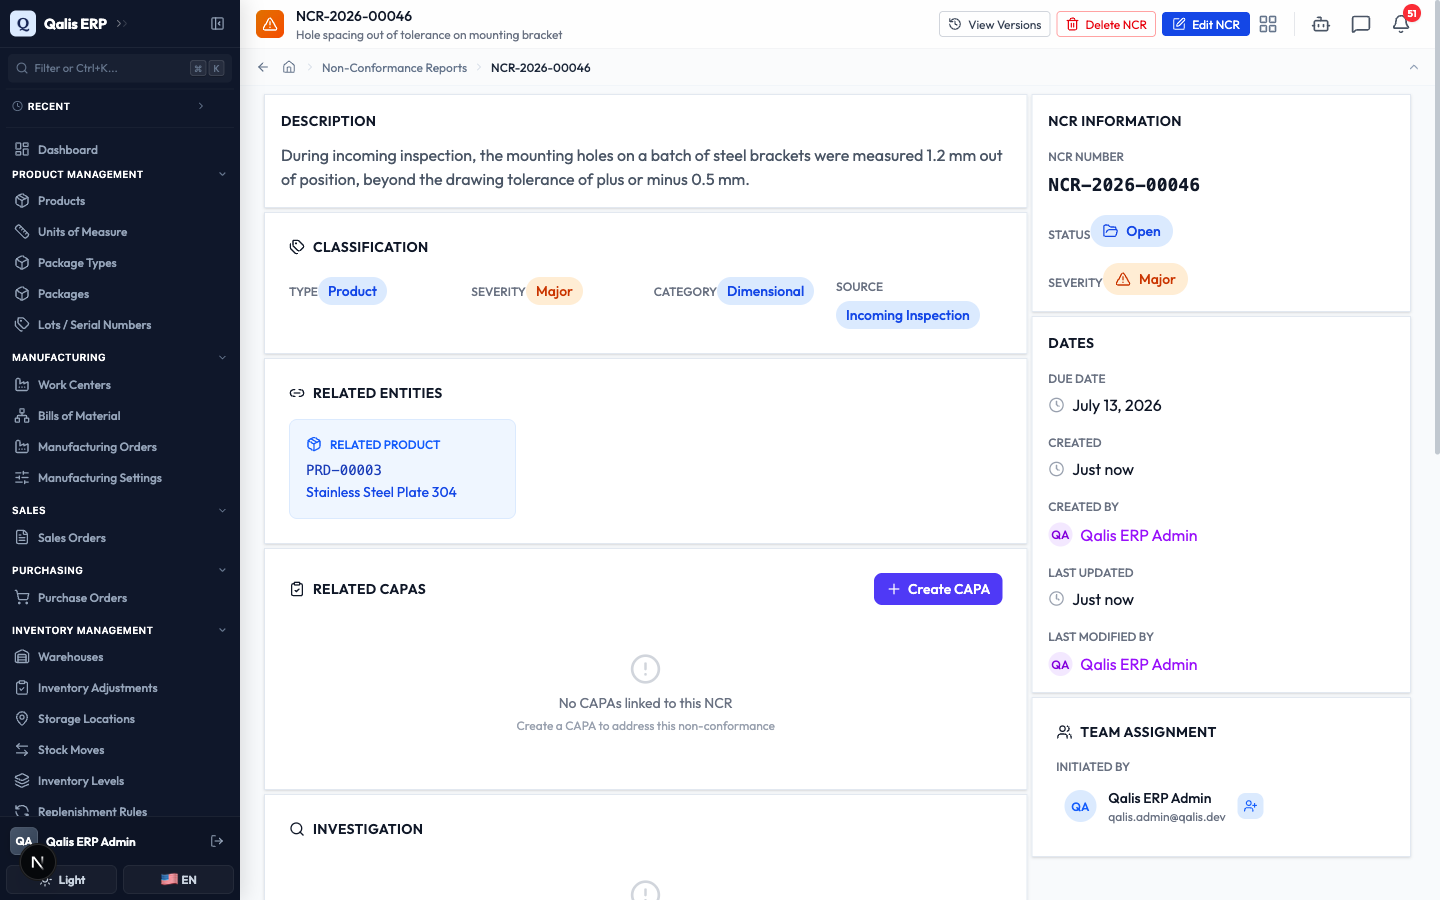
Qualis saves the NCR, gives it a number, and takes you straight to its detail page.
You do not have to finish everything in one sitting. Save the NCR with the basics, then come back later to add the investigation, the disposition, and the costs as you learn more.
Read an NCR's details
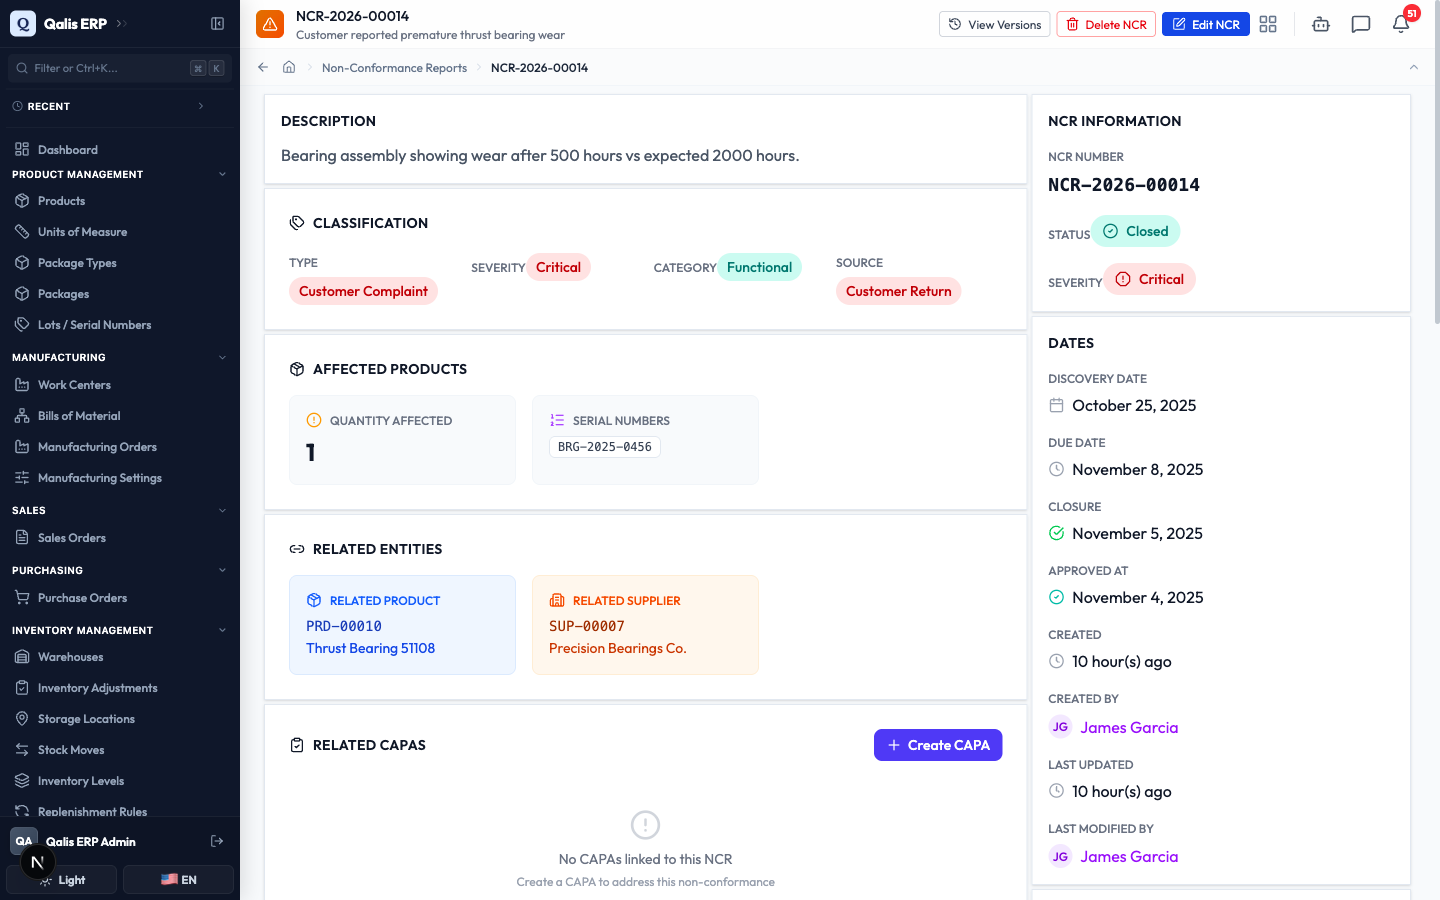
Open any NCR to see the full picture at a glance. Click its NCR Number in the list. The top of the page shows the number and title with View Versions, Delete NCR, and Edit NCR buttons. The example below is a fully worked NCR that has been investigated and closed.
- The main column lays out the record top to bottom. The Description explains the problem. Classification shows the type, severity, category, and source as colored tags. Affected Products shows how many units and which serial numbers are involved. Related Entities shows the linked product and supplier as clickable cards, so you can jump straight to them. The right sidebar gives you the quick facts: the NCR Information (number, status, severity), the key Dates, and the Team Assignment (who raised it and who it is assigned to).
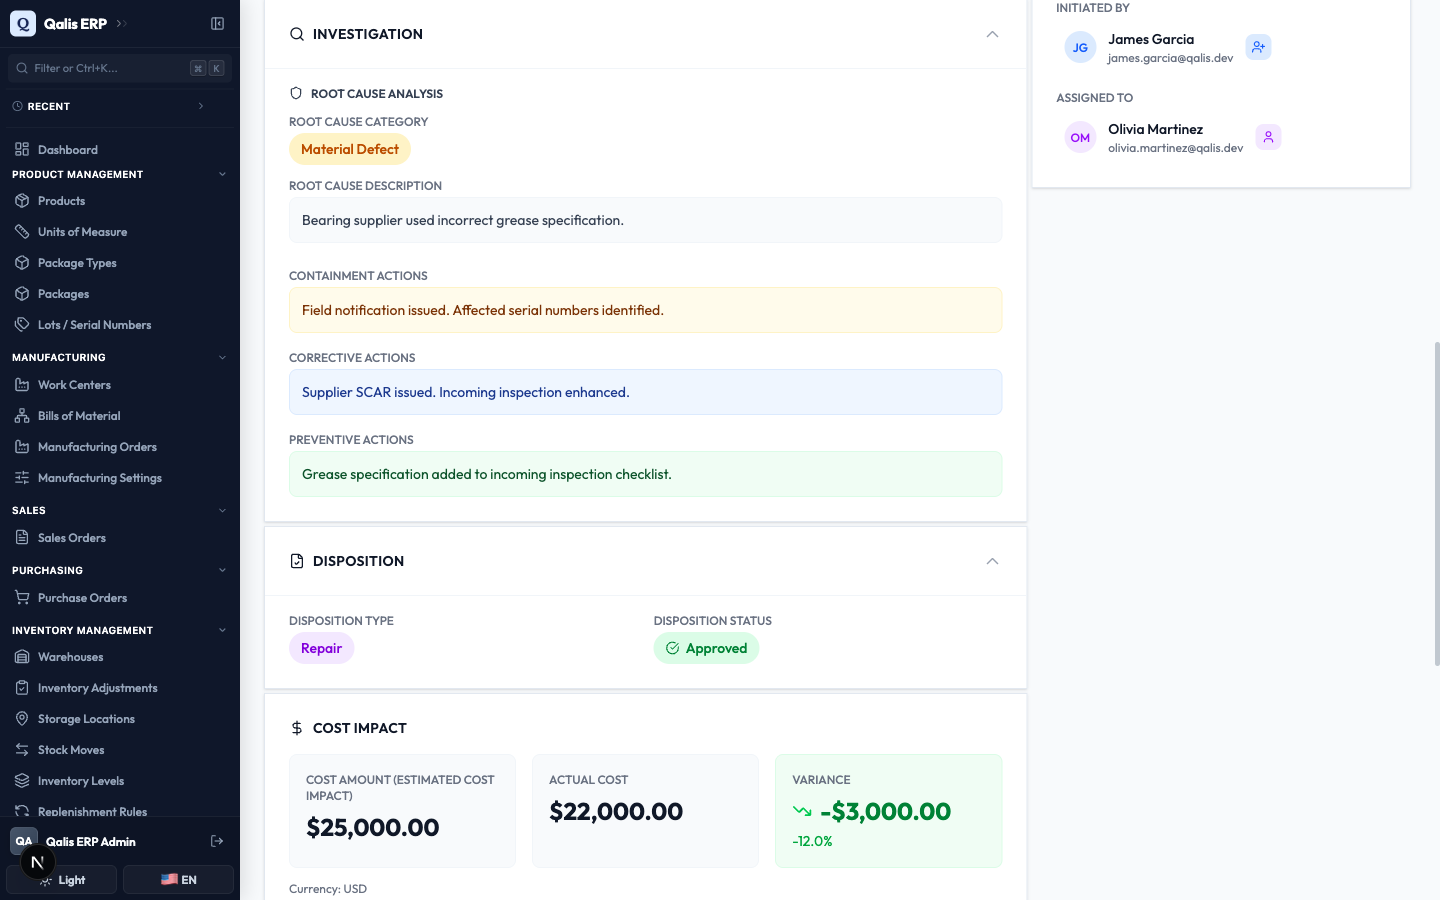
- Scroll down to the Investigation section to read the root cause analysis: the Root Cause Category, a written Root Cause Description, and the Containment, Corrective, and Preventive actions taken. Below that, Disposition shows the decision on the goods and whether it was approved, and Cost Impact shows the estimated cost, the actual cost, and the difference between them.
Investigate and close an NCR
As you work the problem, you edit the NCR to record what you found, decide what to do with the goods, and move it toward closure. You do this from the same four tabs you used to create it.
Record the investigation
- On the detail page, click Edit NCR at the top right.
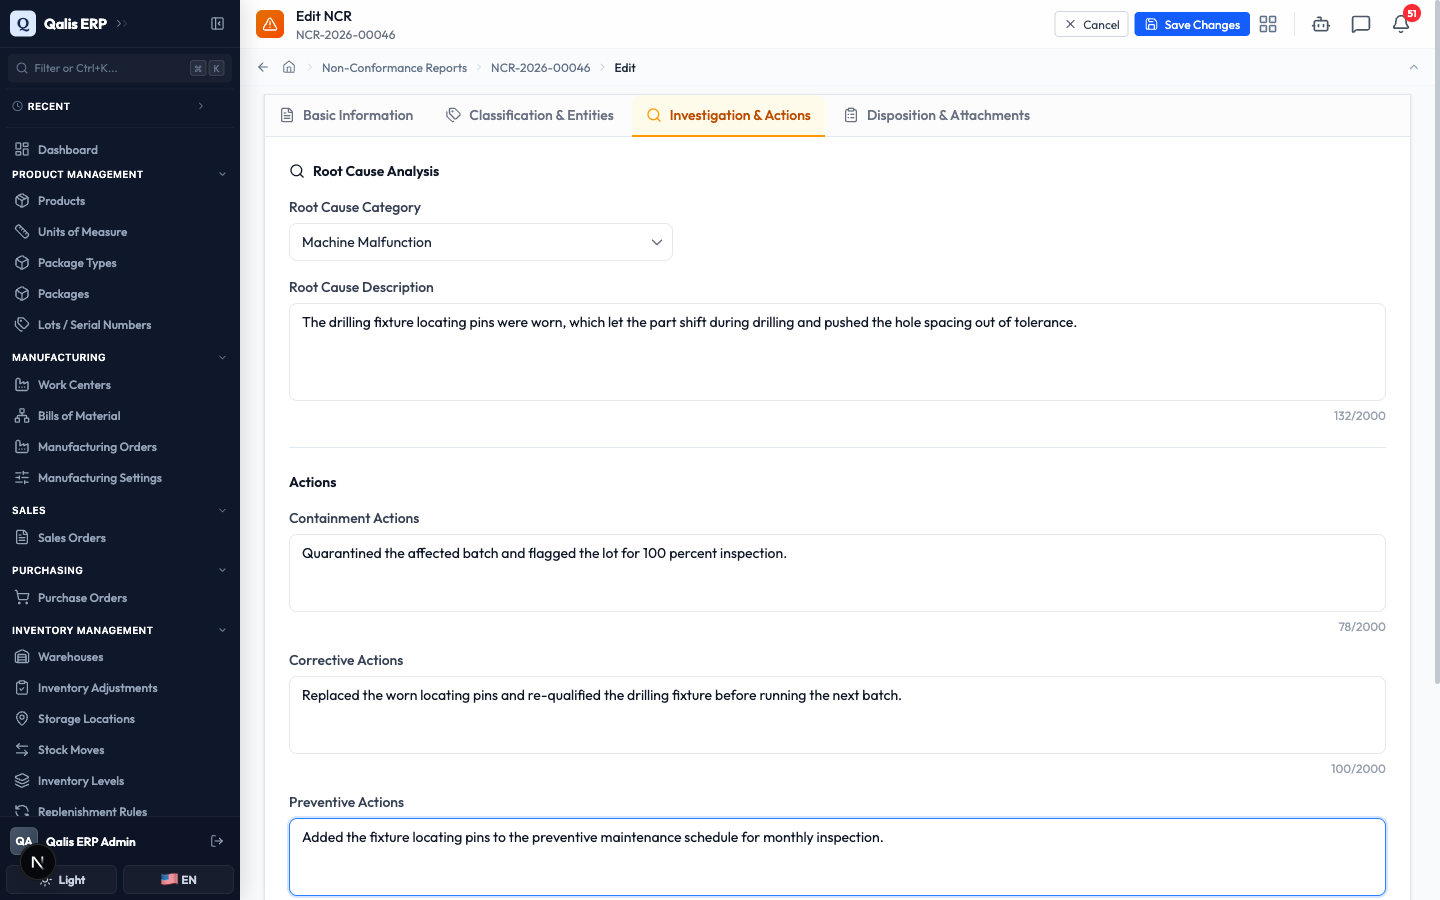
- Open the Investigation & Actions tab. Choose a Root Cause Category (the kind of cause, such as Machine Malfunction or Human Error) and write the Root Cause Description. Then describe the Containment Actions you took right away, the Corrective Actions that fix the problem, and the Preventive Actions that stop it coming back. Each box shows a character count as you type.
Decide a disposition and record the cost
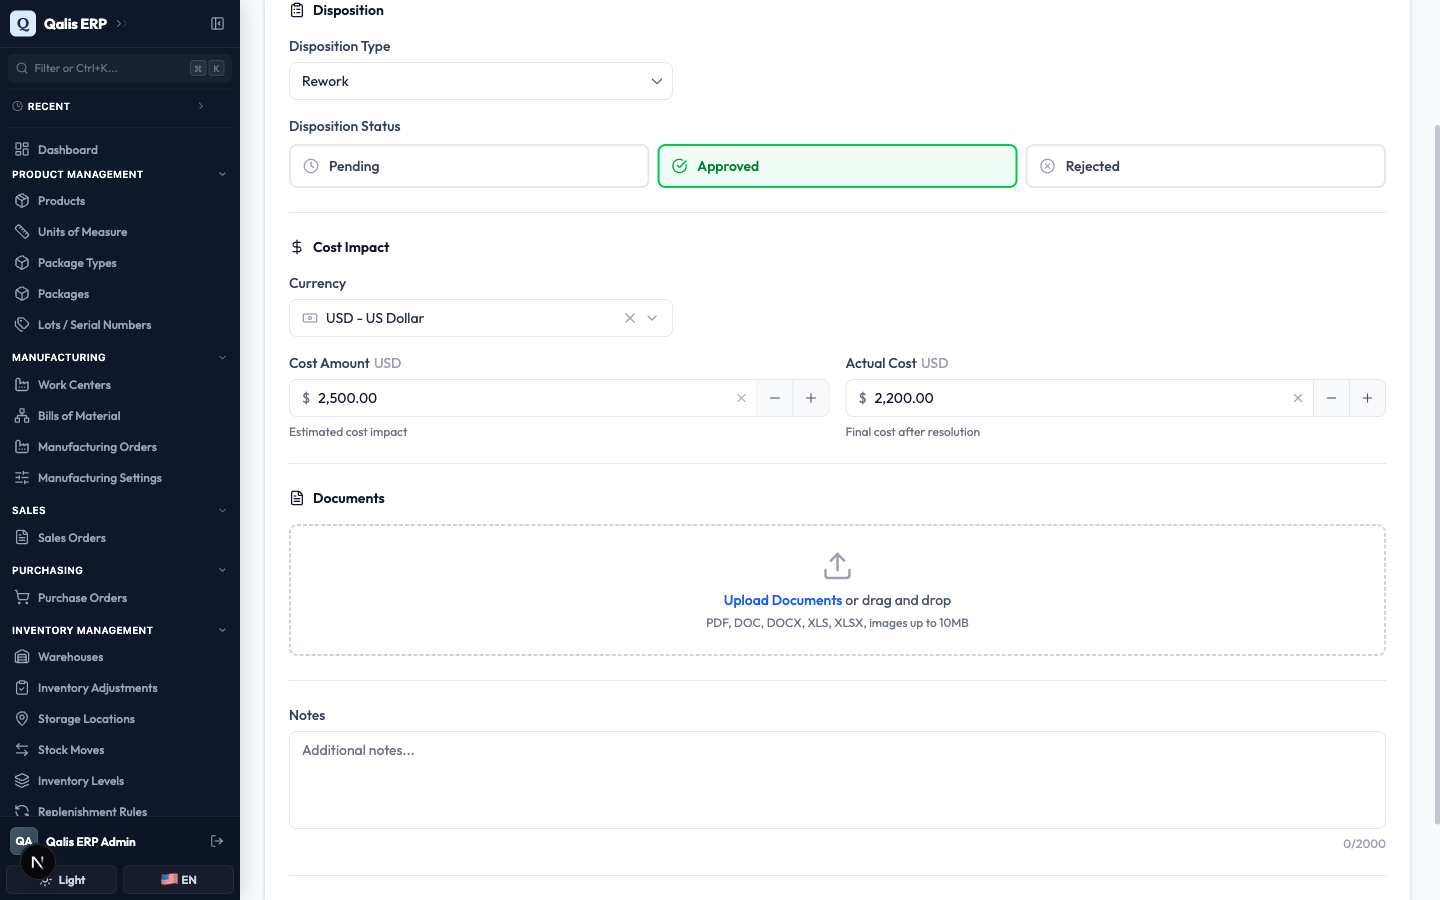
- Open the Disposition & Attachments tab. Pick a Disposition Type to say what happens to the affected goods: Use As Is, Rework, Repair, Scrap, Return to Supplier, Concession, or Deviation. Then set the Disposition Status to Pending, Approved, or Rejected.
- Under Cost Impact, record the Cost Amount (your estimate) and, once known, the Actual Cost. Qualis formats the amounts in your chosen Currency. You can also drag evidence files onto the Upload Documents area, such as photos of the defect or a test report.
Send it for closure
- Go back to the Basic Information tab, set Status to Closed, and click Save Changes at the top right.
- Because closing an NCR is a controlled step, Qualis does not close it on the spot. Instead it sends the closure for approval and shows a banner on the detail page: Approval Status: In Progress, who it was submitted by, and who needs to approve it (here, a Quality Manager). The NCR stays Open until that person approves. Click View Approval to see where it stands.
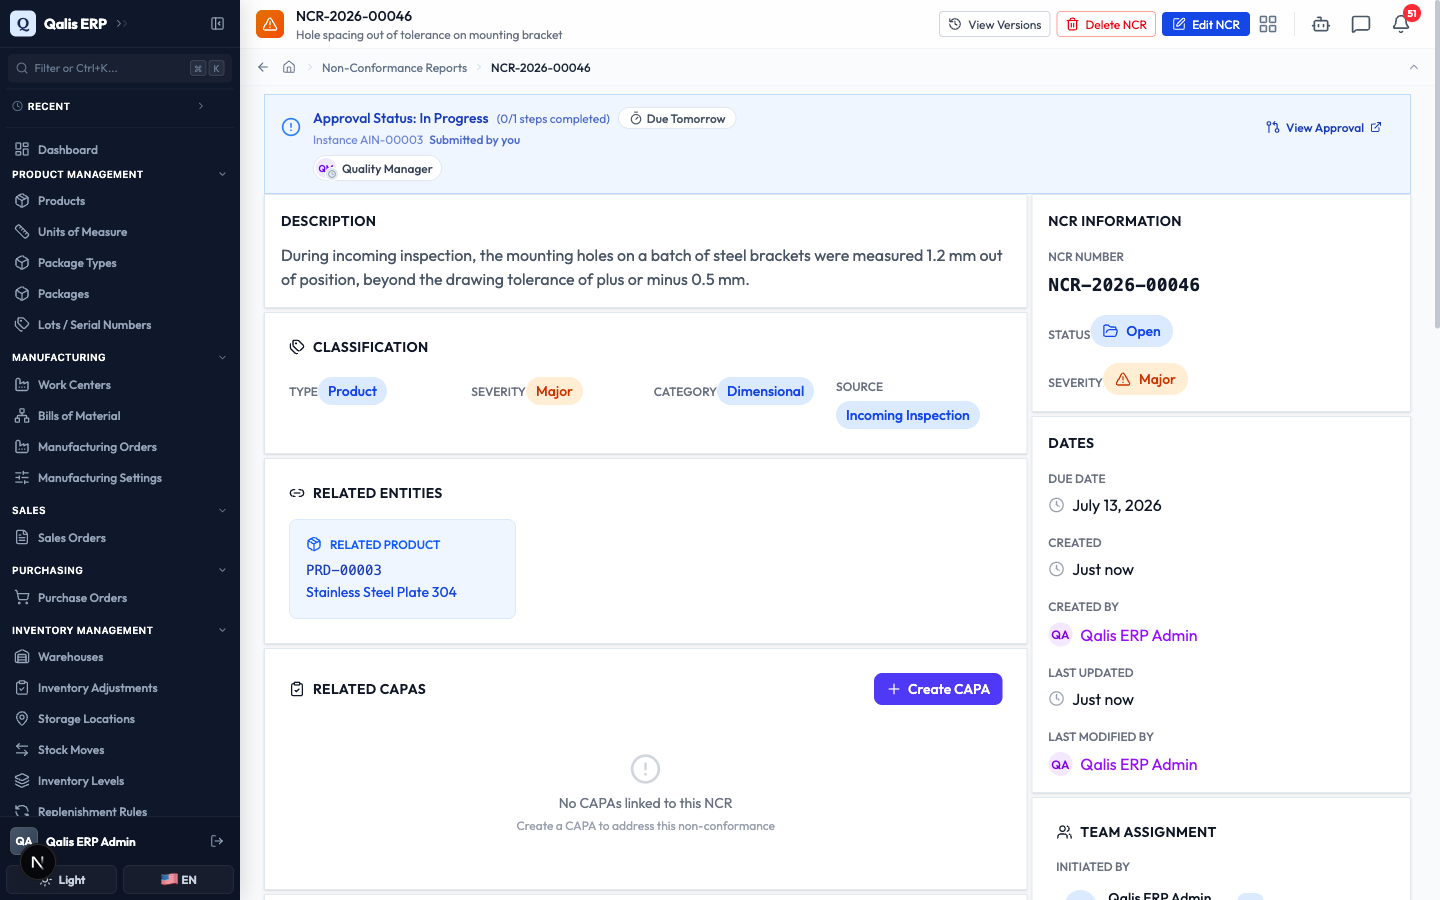
Once the approver signs off, the NCR moves to Closed and the banner clears. Until then, your investigation and disposition are saved and visible to everyone, so nothing is lost while you wait.
Raise a CAPA from an NCR
When a problem needs a formal corrective or preventive action, you can raise a CAPA (Corrective And Preventive Action) straight from the NCR, already linked back to it.
- Open the NCR's detail page and find the Related CAPAs section. Click Create CAPA.
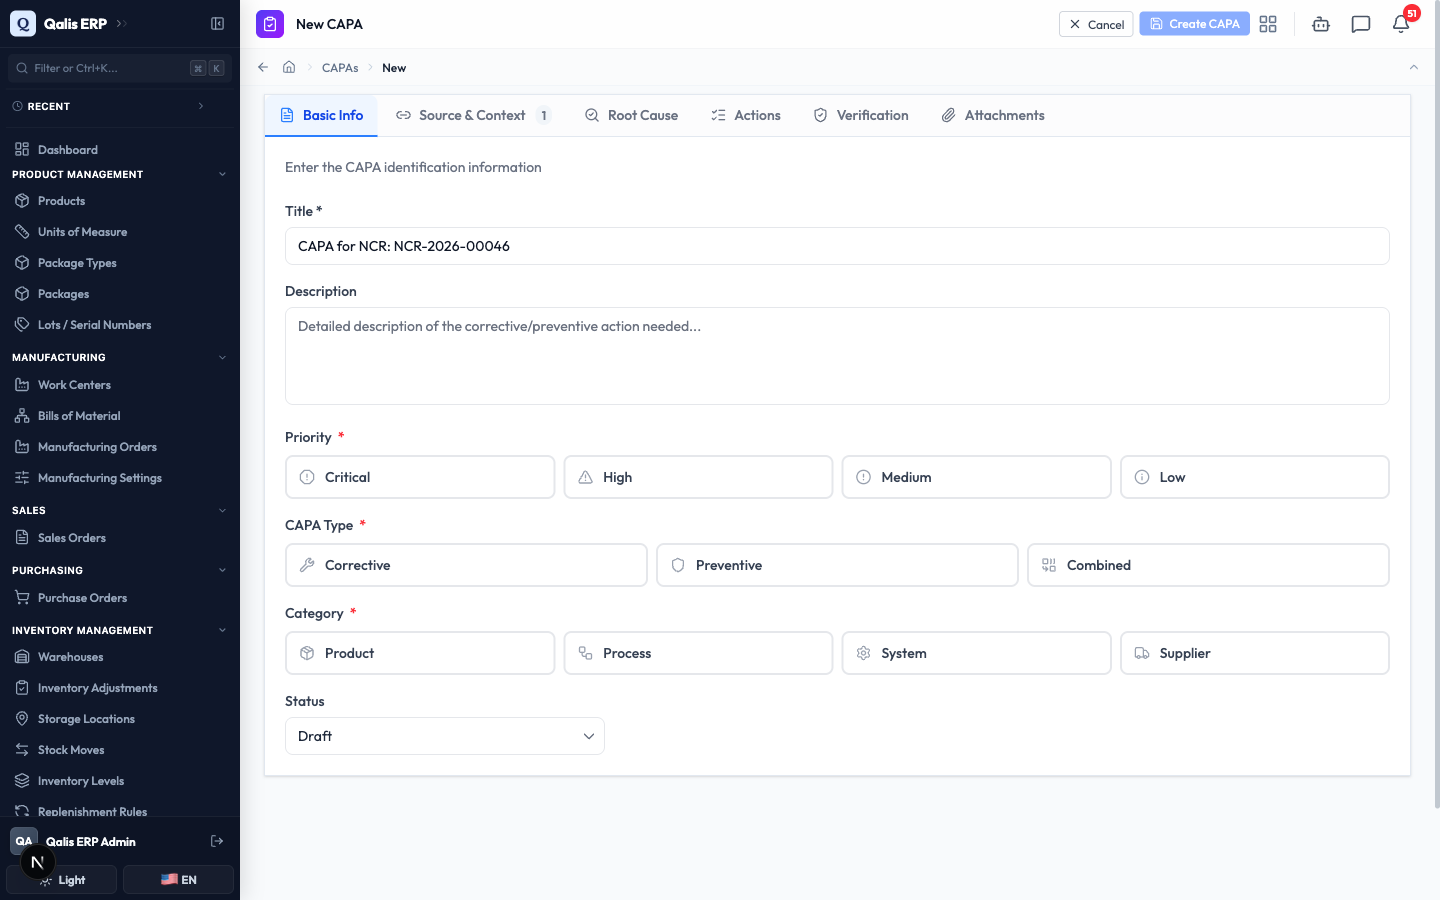
- The CAPA form opens with the Title already filled in as "CAPA for NCR:" followed by the NCR number. Set the CAPA's Priority, Type (Corrective, Preventive, or Combined), and Category, then continue through its tabs.
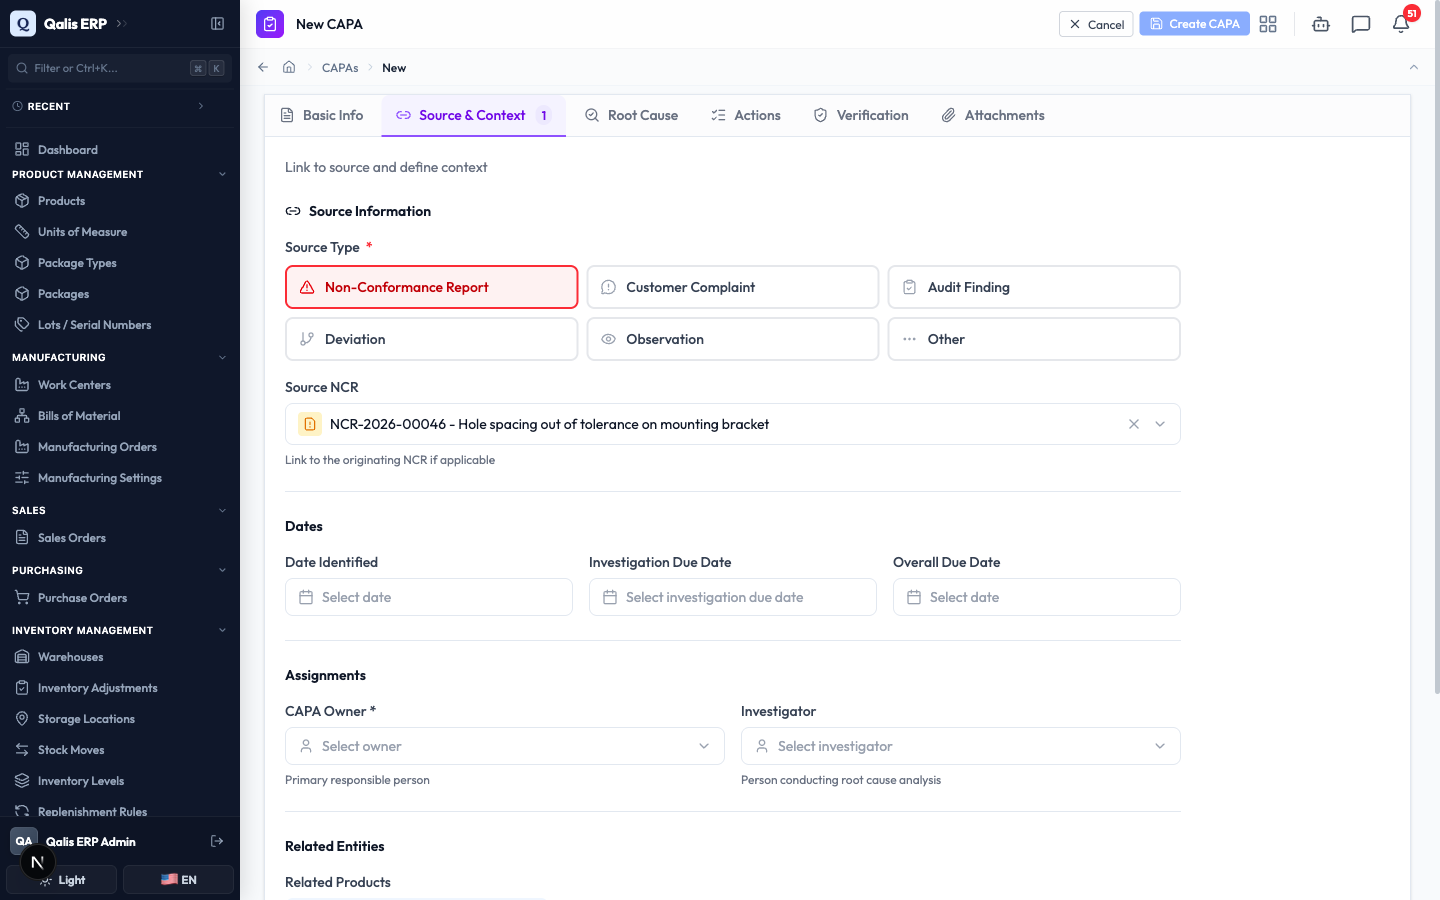
- On the CAPA's Source & Context tab, the Source Type is already set to Non-Conformance Report and the Source NCR is already linked to the NCR you started from, so the two records stay connected.
Finish and save the CAPA, and it appears under Related CAPAs on the NCR. For the full CAPA workflow, see the Corrective and Preventive Actions (CAPA) guide.
Export your NCRs
When you need your NCRs outside Qualis, for a report or an audit, you can export them.
- On the list, tick the checkbox at the start of each row you want. A bar appears showing how many are selected.
- Click Export CSV or Export Excel. Your file downloads with the selected records and their details.
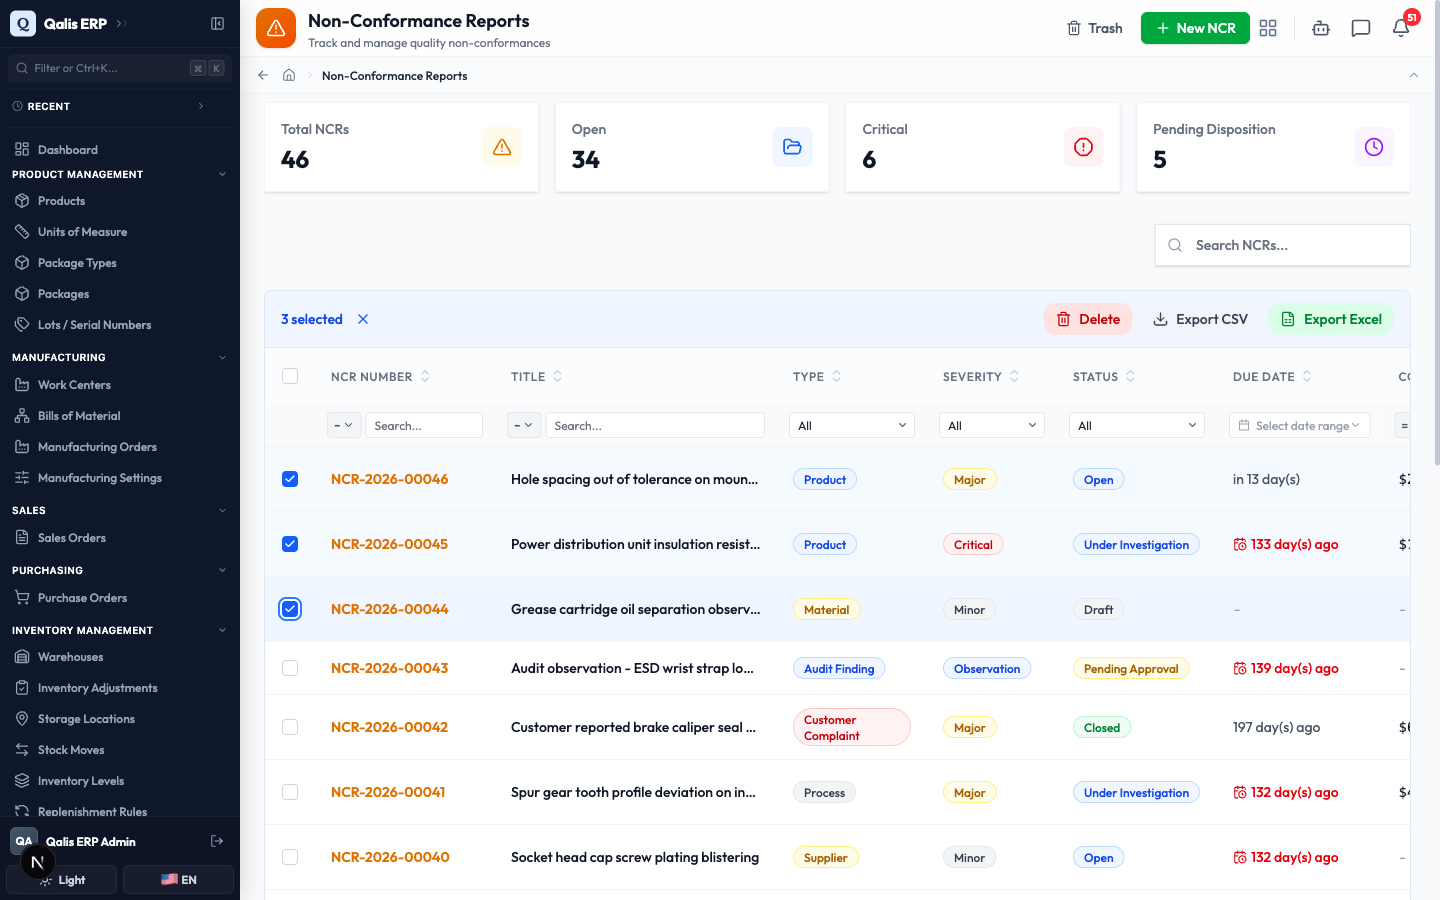
To export many records at once, use the checkbox in the table header to select the whole page first.
Good to know
A few terms show up throughout the module:
- Severity: how serious the problem is. Critical is urgent or safety related, Major is significant, Minor is small and easily corrected, and Observation is a note rather than a defect.
- Type: the broad kind of non-conformance, such as a Product fault, a Process issue, a Material defect, a Supplier problem, a Customer Complaint, or an Audit Finding.
- Source: where the problem was caught, such as Incoming Inspection (goods arriving from a supplier), In-Process, Final Inspection, a Customer Return, an Audit, or a Supplier Notification.
- Category: the nature of the defect, such as Dimensional (wrong size), Visual, Functional, Documentation, Packaging, or Contamination.
- Root cause category: the underlying reason, grouped into common causes such as Human Error, Machine Malfunction, Material Defect, Method Issue, Measurement Error, Environment, and Design Issue.
- Disposition: what happens to the affected goods, such as Use As Is, Rework, Repair, Scrap, Return to Supplier, Concession, or Deviation.
- CAPA: a Corrective And Preventive Action, the formal follow-up you open to fix a problem for good and stop it happening again.